CONVERSATIONS
Manage Conversations
Conversations have a total of four different statuses: mark as read, archive, delete and restore. You can manage the status of a conversation by opening it in the conversations area and then clicking any of the corresponding icon buttons in the top right of the conversation window.
Search for conversations
You can for conversations by department ID, assigned agent ID, conversation title, conversation ID, message text, message attachments name, user first name, user last name, user email
Information
- When you empty the trash, all the conversations in the trash are permanently deleted.
- When a user sends a new message to an archived or trashed conversation, the conversation is automatically restored and will now be visible in the Inbox area.
- Trashed conversations are deleted automatically after 30 days.
- When a user is deleted, all the conversations and messages are permanently deleted too.
- An agent can delete their messages by opening the message menu and clicking Delete. The message menu becomes visible when you hover the mouse cursor over the message.
Text Editor and Automated Messages Features
The text editor of the admin area and automated messages(example: welcome and subscribe messages) can be used to create stylized messages:
- Links formatting — All text links are automatically converted to clickable hyperlinks.
- Text formatting — The editor also supports text formatting syntax:
- To make text bold, surround it with *: *your text*.
- To make text italic, surround it with __: __your text__.
- To make text
strikethrough, surround it with ~: ~your text~. - To insert a single-line code comment, surround it with `: `your text`.
- To insert a code block, surround it with ```: ```your text```.
- HTML and other code languages — For security reasons, no HTML, JavaScript (JS), or other code languages are permitted. However, you can use HTML snippets by utilizing custom rich messages (discussed below).
- To insert a line break into a message, use the keyboard combination SHIFT + ENTER or CTRL + ENTER.
Merge fields
Merge fields are strings replaced by external values when used. Merge fields can be used in any message or automated message, including chatbot messages.
| Code | Description |
|---|---|
{user_name}
|
Full name of the active user. |
{user_email}
|
Email of the active user. |
{agent_name}
|
Full name of the active agent. |
{agent_email}
|
Email of the active agent. |
Rich Messages
Rich messages are special messages with interactive features like buttons, dropdowns, or inputs. They allow an agent to request information from the user via a user input form or to diplay interactive contents. Rich messages can be inserted into a chat message using shortcodes. Shortcodes accept various parameters like title and description. The available rich messages are listed below.
How it works:
Create and send
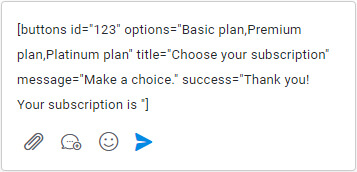 Create a rich message by inserting the shortcode into the text editor of the admin area. Customize all of the parameters with your information and send your message.
Message is displayed
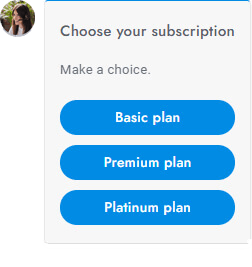 When a shortcode is used, the user sees the rich message (not the shortcode) and can select or enter the required information to complete the form submission.
User's response is submitted
 Once the rich message form has been filled out and sent by the user, a success message is shown and the form data is saved.
Rich Messages
| Name | Shortcode | Description |
|---|---|---|
| Card |
[card image="URL" header="TITLE" |
Call-to-action card with an image, title, description, link, and more. |
| Slider |
[slider image-1="URL" header-1="TITLE" |
Slider of call-to-action cards with an image, title, description, link, and more. You can add up to 10 slides. |
| Slider images |
[slider-images images="URL,URL,URL"] |
Slider of images. |
| Chips |
[chips options="A,B,C"] |
List of buttons. |
| Buttons |
[buttons options="A,B,C"] |
List of buttons. |
| Select |
[select options="A,B,C"] |
Dropdown list of options. |
| Inputs |
[inputs values="A,B,C" button="Send now"] |
List of text inputs. |
[email name="true" |
Form to collect the user's email and phone number. All attributes are optional. Follow up settings used as default values. Add the attribute required-messaging-apps="true" to force users to provide their email and phone on messaging apps. | |
| Registration |
[registration] |
Registration form. |
| Timetable |
[timetable] |
Timetable. |
| Articles |
[articles link="https://www.contactcenter.gr/articles-demo"] |
Articles with search area. The link attribute is used as fallback message for Facebook Messenger, WhatsApp, Telegram messages. |
| Rating |
[rating label-positive="Helpful" |
Agent rating form.
To make the rating shortcode work on WhatsApp, Messenger, Telegram you need to use Dialogflow and the chatbot, create a
new Intent with rating as input Context, nothing as output Context, a
list of the user's most common messages for a positive rating as Training phrases(e.g. good, positive)
and { "rating": 1, "force-message": true } as Custom Payload response. For the negative rating create a new intent with same context but replace the training phrases and the custom payload to { "rating": -1, "force-message": true }
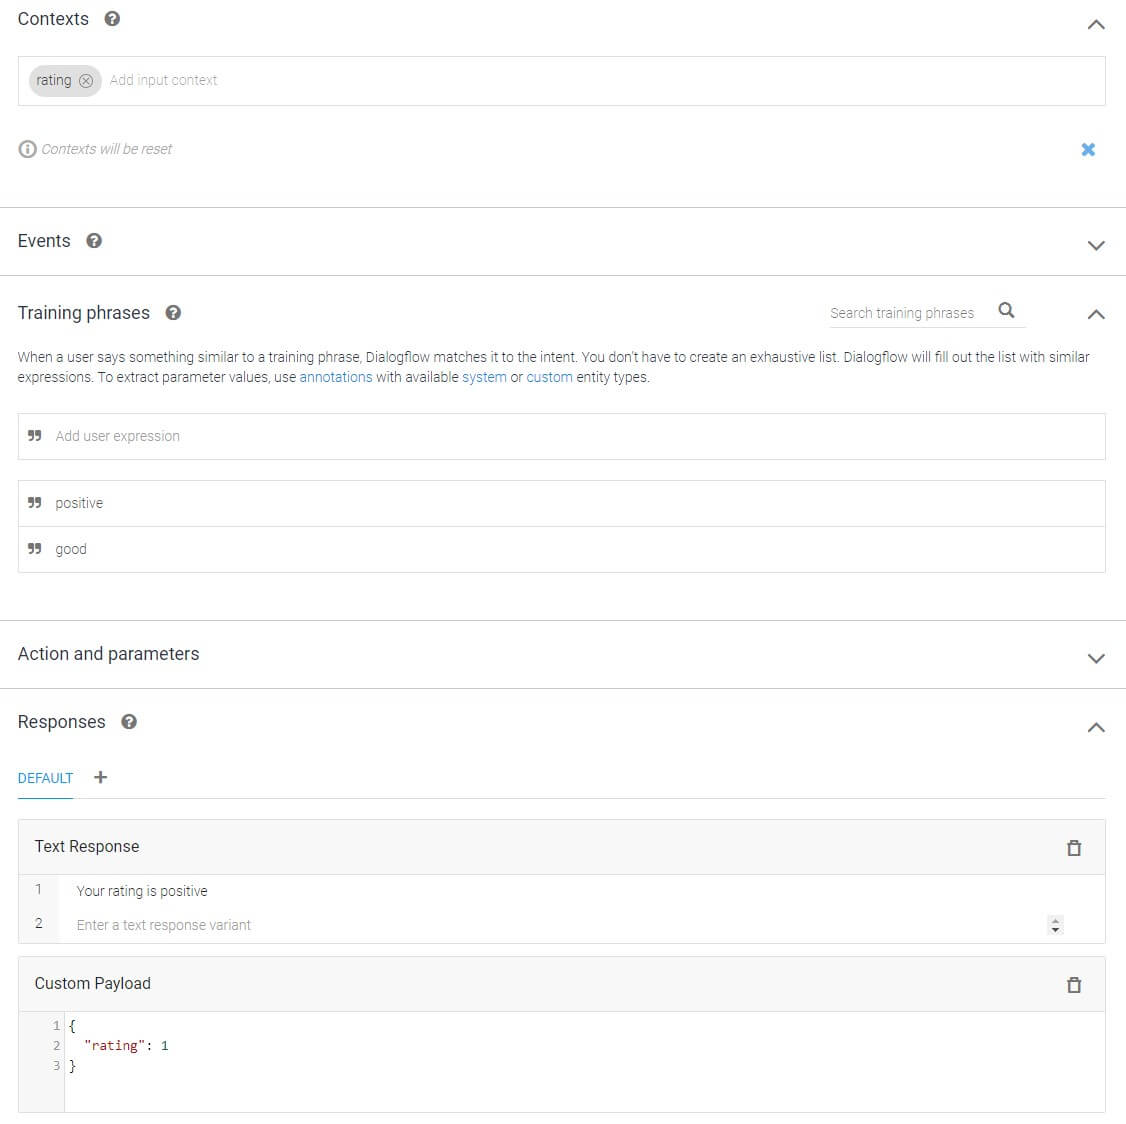 . The shortcode must include also a title or message.
|
| List |
[list values="A,B,C"] |
Text list. |
| List double |
[list values="A:X,B:Y,C:Z"] |
Text list with titles. |
| List image |
[list-image values="URL:A,URL:B,URL:C"] |
Text list with titles and images. |
| Table |
[table header="A,B,C" values="A:B:C,A:B:C,A:B:C"] |
Table. |
| Button |
[button link="https://www.contactcenter.gr" |
Display a link or open an article. The attribute target="_blank" is optional and open the link in a new window. The attribute style="link" is optional and change the button design. To open an article on click the link value must be #article-ID, replace ID with the article ID. |
| Video |
[video type="youtube" id="0TImic4N1ko" height="350"] |
Display a YouTube or Vimeo video. The value of the attribute type can be youtube or vimeo. The attribute id is the ID of the video, get it from the URL. The attribute height is optional and sets the video height in px. |
| Image |
[image url="https://www.contactcenter.gr/media/admin.png"] |
Image. |
| Share |
[share fb="https://www.contactcenter.gr/" |
Social share buttons. |
Global parameters
All of the rich messages support the following parameters:
| Parameters | Description |
|---|---|
id="123"
|
The ID of the rich message (used also to save the JSON data). |
title="ABC"
|
The rich message title. |
message="ABC"
|
The rich message description that appears underneath the title. |
success="ABC"
|
The message that appears when the user completes and sends the rich message. The user input is appended to this message. |
settings="ABC"
|
Extra field for optional extra values. |
Custom rich messages
You can create custom rich messages with your own custom content by going to Settings > Miscellaneous. Currently, custom rich messages are static and there are no interactive options available as there are with shortcodes. However, you can insert custom HTML codes.
HTML codes
When creating a custom rich message, you can use the following codes:
| Code | Description |
|---|---|
<a href="https://www.google.com" |
Link with button design. |
<a href="https://www.google.com" |
Link. |
<div class="sb-image"><img |
Image that zoom on click. |
USERS
Manage Users
Manage users from the Users area in the left menu of the admin area.
Search users
You can search users by name, surname, email, and custom fields.
Delete users
You can delete a user by opening the User edit box and then clicking Delete user. To delete multiple users at once, select the users you want to delete from the Users table and then click the top right Delete icon.
- When a user is deleted, all of their conversations and messages are automatically deleted permanently.
- If a user of a deleted user come back to the website, a new user is automatically created.
- Visitors are automatically deleted every 24 hours.
Additional user table columns
To display additional columns in the user table go to Settings > Admin > Users table additional columns and add the new columns. The value of each column is the slug of the user detail or extra user detail you want to display. The slug is lowercase and with spaces replaced by the char -. For example, the slug of the extra user detail "Date of birth" is "date-of-birth".
User types
| Type | Description |
|---|---|
user
|
A "user" is any user with an email. |
lead
|
A "lead" is any user with no user details, who is automatically registered, and with at least one conversation. |
visitor
|
A "visitor" is any user who has not started a conversation. Note: Visitors are automatically deleted every 24 hours. |
Manage Agents
Manage agents from the Users area. An agent is a special user that can log in to the admin area and reply to all of the conversations. There are two types of agents: Agents. Admins are the only ones that can create new Agents; they also have access to the settings area. Agents can only manage users and conversations.
Information
- New users are automatically displayed in the user table in real time.
- To view online users and receive the online user notification enable Settings > Users > Register all visitors.
- To receive the online user notification you need to enable also Settings > Miscellaneous > Pusher.
- The log-in form is shown only if the registration password field is shown.
- If Settings > Users > Allow Duplicate Emails is enabled and a user enters an already registered email, a new user is created and the email is removed from the old user. The new user will not have access to the old user's messages and conversations. You can also automatically log in a user via URL parameters.
SETTINGS
Office Hours
You can set the office hours timetable from Settings > Miscellaneous. Office hours are used for:
- Automatically displaying the timetable and a message when a user sends a message during out-of-office hours or if all agents are offline. To enable this feature set up the Offline message at Settings > Messages > Offline Message. The offline message is sent to the same user maximum 1 time per hour.
- Disabling and hiding the chat during out-of-office hours.
- Disabling the Dialogflow chatbot during regular office hours and enabling it during out-of-office hours.
More information
- Blank values in the timetable settings are considered out-of-office hours.
- The office hours are in UTC format. Your UTC is generated automatically when you click the field Settings > Miscellaneous > UTF offset. To manually get the UTC offset of your area, go to: https://browserspy.dk/ or wikipedia.org/wiki/List_of_UTC_time_offsets and copy the offset (e.g. for UTC −12:00, enter -12). Only integers are accepted. If your offset is not an integer (e.g. UTC -12:30 or UTC -12:45), try searching for an alternative UTC offset. If you can't find an integer offset, you will need to manually adjust the times in the office hours table to fix the gap.
- The date and time format of the timetable matchs automatically the one used in the country of the browser language of the user.
- The offline message is not sent automatically if Settings > Dialogflow > Human takeover is active. When the Dialogflow human takeover option is active, the offline message is sent only on human takeover.
- The offline message is not sent is you're using the Slack app and you or any other agent is online via Slack.
Knowledge Base Articles
Knowledge base articles provide instant answers to customers to help reduce customer support volume. To manage the articles, go to Settings > Articles. Articles support HTML code, which can be used to add images, videos, and other content. Here are some HTML code examples that you can use:
| Name | Code |
|---|---|
| Button |
<a href="https://www.google.com" target="_blank" class="sb-rich-btn sb-btn">Click here</a> |
| Image |
<img src="https://via.placeholder.com/1500x600" /> |
| Image with lightbox |
<div class="sb-image"><img src="https://via.placeholder.com/1500x600" class="sb-image" /></div> |
| Video |
<video controls><source src="video.mp4" type="video/mp4"></video> |
| YouTube and Vimeo | Enter the embed code provided by YouTube or Vimeo |
Display articles
- The articles can be shown in the chat dashboard by enabling them from the Settings > Chat area.
- The articles can be shown in a dedicated page by inserting the code
<script>var SB_ARTICLES_PAGE = true;</script>into any page showing the chat. To set the location of the articles area Enter the code<div id="sb-articles" class="sb-loading"></div>. - Alternatively, articles can be shared via the rich message shortcode, [articles].
More information
- Translate the categories from Settings > Translations by adding the translation name and its translation.
- If you use categories, only the articles assigned to a category are displayed.
- If there is at least one translated article in the user's language, only the translated articles are displayed.
- Articles are synchronized automatically with the Dialogflow knowledge base if the Dialogflow app is installed.
- You can create an internal chat link to an article with the button rich message.
- You can create external article links with the URL attribute article=ID, replace ID with the article ID.
Language and Translations
ContactCenter is fully multilingual and provides powerful features to detect the user's language on the fly.
Edit translations
To edit the languages of both chat and admin, go to Settings > Translations. Some settings, such as e-mail contents, are directly translatable and therefore do not need to be translated here.
Chat language
ContactCenter is already translated into 41 languages. There are many options available to set the language:
- OPTION 1 Go to Settings > Chat and check the Translate automatically option. This feature will automatically use the chat language of the user's browser.
- OPTION 2 - PHP ONLY Add the URL parameter lang=LANGUAGE-CODE to the script that loads the chat, replacing "LANGUAGE-CODE" with the two-letters language code you would like to display. Example: https://cloud.contactcenter.gr/account/js/init.js?lang=en. Go to wikipedia.org/wiki/List_of_ISO_639-1_codes for the complete languages code list (see column 639-1).
Translate custom contents
You can translate almost any custom content: rich messages, titles, descriptions, automatic messages, chat header, and more. To add translations, select the language you want and click the New translation button.
Information
- If a translation string is missing, add it by clicking the button Add new translation.
- If a translation string is not working, make sure to remove all white spaces and break lines at the start and the end of the string.
- Some special chars like & are replaced by the HTML equivalent code (see https://www.w3schools.com/html/html_entities.asp). Ex. & is replaced by &
Departments
Departments give you the power to distribute conversations and assign various agents to specific departments. For example, you can create a department entitled "Sales" and assign specific conversations to that department. To start using departments, follow the steps below:
- Go to Settings > Miscellaneous and add your required departments. After saving, reload the page.
- Go to Users > Agents and edit an agent, you will see a new field where you can set the department of the agent.
- Reload the page and you're done! In the Conversations area, you will now see an option to set the department.
Settings
- Display in dashboard Displays the departments' list in the chat dashboard and force users to choose a department before starting a conversation.
- Display images Displays the department image instead of the department color.
- Label Replace the label Departments (plural) with another text. The name is displayed in the admin and tickets area.
- Label single Replace the label Department (singular) with another text. The name is displayed in the admin and tickets area.
- Dashboard title Set the title of the chat dashboard list. Default: Departments.
How it works
- Agents and admins can only access conversations, users, and agents that have been assigned to their specific department.
- When an agent is assigned to a new department, an email notification is sent to all of the agents assigned to the new department.
- The General department is global and gives agents access to all of the conversations within all departments. Also, all agents without a department are automatically assigned to the General department.
- To automatically assign a department to the user conversations you can Enter the JavaScript variable var SB_DEFAULT_DEPARTMENT = ID; into the pages where the chat is displayed, replace ID with the department ID.
- Admins with no assigned department always see the conversations of all departments.
- The chatbot can assign a department to the active conversation via dialogflow actions.
How to assign a department
You can assign a department to a conversation in several ways:
- Via Settings > Miscellaneous > Departments settings > Display in dashboard. This setting will force the user to choose a department when starting a new conversation.
- Via Settings > Automations > More.
- Via JavaScript the variable var SB_DEFAULT_DEPARTMENT = ID;. Enter the code into the pages where the chat is displayed and replace ID with the department ID.
- Via API.
Queue
When the queue is activated via Settings > Miscellaneous > Queue, users enter into a queue automatically when an agent's chat limit is reached. When a user enters the queue, a message with the current position in the queue and the estimated waiting time is displayed. ContactCenter automatically assigns the conversations to all available agents proportionately. When an agent marks a conversation as completed (by archiving it), the queue is updated and a new conversation is received.
More information
- Only online agents are counted as "available" agents; only online agents will receive new conversations.
- Admins are not included; admins always see all the conversations.
- Agents must archive a conversation to mark it as completed; this will automatically give them access to the next conversation in the queue.
- Agents can switch their status between online and offline by hovering over their profile image and then clicking the label of the profile pop-up at the bottom-left of the admin area.
- Agents can only view their conversations; however, they can see all of the conversations of a single user.
- Agents can only search and filter their conversations.
- The waiting time is displayed in minutes and is calculated as follows: queue position X response time = waiting time. For example, if a user is 5th in the queue, and the response time has been set to 4 minutes (via Settings > Miscellaneous > Queue), then the total wait time displayed to the user will be 20 minutes.
- If a user is in the queue and leaves (e.g. by closing the browser) for more than 1 minute, the conversation is saved; however, once the user comes back, the queue is reset and the user will lose their previous position.
- The queue is compatible with the departments.
- If Dialogflow human takeover is active, the queue is activated only on human takeover.
- For conversations started from messaging apps like WhatsApp, it is not possible to respect the limit of conversations per agent, all conversations will be immediately and proportionally assigned to an agent.
- Use Settings > Messages > Offline message to prevent the chat from showing the queue update message to the user.
- When the sound option is active, a sound is played when it's the user's turn.
How to test the queue
- To simulate multiple users and agents, open the chat in multiple different browsers (e.g. Opera, Firefox, Brave, Chrome, etc.). Each browser can simulate two users/agents: one in normal mode and one in "private" or "incognito" mode.
- To reset the chat and start a new user session, open the browser console, enter SBF.reset(), and press ENTER.
Routing
When the routing is activated via Settings > Miscellaneous > Routing, ContactCenter automatically assigns the users conversations to all available agents proportionately.
Information
- Conversations are assigned to online agents first. If all agents are offline, conversations are assigned proportionally between all agents.
- Conversations are assigned to agents with less active conversations. A conversation is active if it's not deleted, or archived. If routing is active, you should archive the conversations once completed.
- Admins are not included; admins always see all the conversations.
- Agents can switch their status between online and offline by hovering over their profile image and then clicking the label of the profile pop-up at the bottom-left of the admin area.
- Agents can view only their conversations; however, they can see all of the conversations of a single user.
- Agents can search and filter only their conversations.
- The routing is compatible with the departments.
- When routing is active agents can manually route conversations to other agents from the right panel of the conversations area.
- If the conversation is archived and the user reopens it in the future by sending a new message, if the assigned agent in the conversation is offline, the conversation is assigned to another agent.
Manual routing
When the routing is activated via Settings > Miscellaneous > Hide conversation of other agents agents see only their own conversations and can select the unassigned ones.
- Agents menu: displays the agents' menu to assign the active conversation to another agent.
- Routing if offline: if the conversation is archived and the user reopens it in the future by sending a new message, if the assigned agent in the conversation is offline, the conversation is assigned to another online if there is at least one, otherwise to no agent.
- View unassigned conversations: allow agents to view the unassigned conversations, when an agent replies the conversation is automatically assigned to him and the conversation is removed in real-time from the admin area of the other agents. Check this option to enable the manual routing.
Email piping
Email piping lets you, your agents, and your users reply to chat messages via email.
Activation
To activate the email piping go to Settings > Notifications > Email piping and enter your POP3/IMAP email server information, then set the email address to use for the email piping in Settings > Notifications > SMTP and you're done! The email address must be the one to which the email piping server connects to. ContactCenter will send all emails from this email address and you, your agents, and your users will reply to this email address.
Information
- The setting Notifications > User email notifications must be enabled to send replies to the user email.
- If you're using the Dialogflow App, and the settings Settings > Dialogflow > Human takeover is active, no emails are sent if the chatbot knows the answer.
- If the setting Convert all emails is active, all emails sent to your inbox will be converted to chat messages, mind that all emails, including spam, promotional emails and more would be wrongly converted too.
- If the setting convert all emails is active, email sent by email addresses of agents and admins will be ignored, use another email address for testing.
- If the setting convert all emails is active, each email sent directly to the email piping address will generate a new user conversation.
- You can not use the same email address used for the email piping to reply. All your ContactCenter agents and admins must use a different email address.
- Agents must reply via email from the same email address registered in ContactCenter .
- When agents reply in ContactCenter, emails are always sent to the user, even if user email notifications are disabled.
- The email is sent to the Agents only if they are offline. If they are online no emails are sent.
- For Google Gmail and Google Workspace emails, you need to replace your Google password with a Google app password, details on https://support.google.com/accounts/answer/185833 (Create & use App Passwords section). Enter imap.gmail.com as host and 993 as port.
-
The
Delimiter option add a text at the top of all emails:
### Please type your reply above this line ###. This text tells ContactCenter to delete all the content below it and it's usefult to cut out all of the reply quotes. Activate it if you see duplicated messages in the chat. If this option is active, you and your users can not use the string ### in the emails.
- Email attachments are supported.
- In order for email piping to work, email replies must contain the ContactCenter recipient's name. Ex. ContactCenter | SB2457-4734 <example@email.com>. All major email clients like Outlook Web, Outlook, Gmail, Yahoo Mail, support the recipient's name by default via chatbot reply or reply all buttons.
- Because of the nature of how emails work, each email client uses their personal codes, delimiters, and automatic strings, and more. For this reason, some chat messages converted from emails can contain invalid texts. We are working to optimize as many email clients as possible, for now, the following email clients are optimized and should not return any invalid text: Outlook Web, Outlook, Gmail, Yahoo Mail.
- Email piping supports departments, if the user's conversation is assigned to a department, the email notifications are sent only to the agents assigned to that department.
Direct messages
Direct messages allow you to send а single chat message, email, or text message, to a single user or several users. Read the information below to understand how it works.
General
- To send a message go to the Users area and click the direct message icon. Direct message buttons are also available in the profile box of the user.
- To send a message to all users, enter All in the User IDs field.
- To send a message to a group of users, enter their IDs in the User IDs field. You can check the users and then click the direct message icon to enter the IDs automatically.
- All message types support merge fields.
Direct chat message
- The chat message is sent to the active conversation, if any, otherwise to a new conversation.
- If the option Settings > User email notifications is active, all users with an email are notified via email.
- If the option Settings > Text message notifications > Active for users is active, all users with a phone number are notified via text message.
- If the option Settings > Push notifications is active, a push notification is sent to all users.
- The message is also sent to messaging apps such as WhatsApp and Messenger if the user is connected to them.
- To send a message to all users of a single messaging app enter one of the following strings: whatsapp, messenger, instagram, telegram, twitter, google, wechat. Enter tickets to send a message only to the users who created a ContactCenter ticket via the Tickets app.
Direct email
- Email header and email signature are automatically included in all emails, set them from Settings > Notifications.
- The HTML language is supported.
- The subject supports merge fields.
Direct text messages
- To enable direct text messages you must enable the SMS in Settings > Notifications > Text message notifications.
Automations
Automations allow running multilingual automatic tasks when conditions set by you are met.
- To delete a condition, set it to empty. To disable an automation, delete all conditions.
- Automations are sent only 1 time to users.
- If you used an automation in the past, and users already received it, you need to delete the automation and create a new one to show it to the users.
- Repeat only works if used in conjunction with date time.
- When date time is used in conjunction with the criteria is exactly, the value must not contain hours and minutes (hh:mm). Ex. 25/10/2021 (25/10/2021 10:30 will not work).
- The setting Settings > Users > Register all visitors must be active if there are message automations that are executed on page load.
- City, countries, languages work automatically only if both the settings Settings > Users > Register all visitors and Settings > Users > Full visitor details are enabled.
- Cities work only if the user detail location is set and equal to city, country, or if the user detail city is set.
- Countries work only if the user details country_code, or country is set, or if the user detail location is set and equal to city, country. The country name must be in english.
- languages work only if the user details browser_language, or language is set.
- A visitor is a Returning visitor only if it visits the website again after 24h or more.
- The pop-ups appear only if the chat is closed, and they overwrite the default pop-up. You can check the message fallback option to send a message instead of showing the pop-up if the chat is open.
- You may need to enable Settings > Users > Register all visitors if you want to send an automated message to new users.
- Chat messages and popup fallback messages are sent only if the last user or agent message of the conversation is older than 10 minutes. This feature prevents unwanted automated messages to be sent during an agent-user conversation.
- The Custom variable condition check for the JavaScript variables with the given names and values. For example, the condition example=ABC is met if into the chat's page there is this JavaScript code: var example = "ABC";. Add multiple variables separated by commas.
NOTIFICATIONS
To understand how notifications work and when they are sent read the information below. If you think notifications are not working, most probably you're just testing them in the wrong way, please read the information below before asking for support.
Email notifications
Both agents and users can receive an email notification when a new message is received.
Email notifications for admin and agents
- When a user sends their first message, if the conversation is assigned to a department, an email is sent only to the agents assigned to that department, if the conversation is assigned to a specific agent, an email is sent only to that agent, otherwise an email is sent to all agents who are not online at the moment. Subsequent emails are sent only to the last agent in the conversation.
- Email notifications are sent only if the last agent in the conversation is offline.
- If you're using the Dialogflow App, and Settings > Dialogflow > Human takeover is active, no emails are sent if the chatbot knows the answer.
- If you don't receive the emails make sure they are working by sending a test email from Settings > Notifications > Test user email or Test agent email. If you don't receive the test email, your server, or your SMTP server, is not working. Open the browser console for more details about the error. Because this is not an issue related to ContactCenter , the support doesn't cover it, please contact your server/hosting/SMTP support instead.
Email notifications for users
- When an agent sends a message to a user, an email is sent to the user only if the user is offline.
- Only 1 email is sent. Subsequent messages will not trigger a new email alert.
Create the email
To manage the emails and create the contents go to Settings > Notifications. You can use text and HTML. New lines are automatically converted to <br />. You can use the following merge fields in the email. Merge fields are automatically replaced with the updated information.
| Code | Description |
|---|---|
{recipient_name}
|
The name of the user or agent who is receiving the email. |
{sender_name}
|
The name of the user or agent who was sending the message that triggered the email notification. |
{sender_profile_image}
|
The profile image of the user or agent who was sending the message that triggered the email notification. |
{message}
|
The links to any attachments that were part of the message that triggered the email notification. |
{attachments}
|
Emails may not be delivered for several reasons; below are the most common ones: |
Problems?
Emails may not be delivered several reasons; below are the most common ones:
| Reason | Description | Solution |
|---|---|---|
| Hosting problems | The email server of your web hosting provider is not able to send emails or the emails are sent but are automatically detected as spam and deleted by the email clients. | Please contact your web hosting provider regarding email support or use your SMTP server by activating it in Settings > Notifications > SMTP. |
| SMTP problems | The email is not sent also if you activated the SMTP option in the Notifications area. | We don't provide support for problems related to your SMTP. Send a test email to get details about the issue. Note: if you're using Gmail enter smtp.gmail.com as host and set 465 or 587 as port. You need also to allow access to Gmail to less secure apps, you can do it from https://myaccount.google.com/lesssecureapps. |
Push notifications
Push notifications are like Desktop notifications but with some key difference. Desktop notifications, also called Web notifications, are requested directly by the client while Push notifications come from a server. The main difference is that the Push notifications work always, also if your device is offline, or ContactCenter is not open. Also, they are persistent and always visible until closed. Push notifications require an external service to work. We use Pusher, it is free to use for the admin notifications sent to the agents, and it's free to use for up to 2000 users/devices when sending notifications to the users. Unfortunately, Apple has yet to provide iOS support, but we hope it will come soon.
Activation
- Go to https://dashboard.pusher.com/accounts/sign_up and create a new account.
- From your dashboard at https://dashboard.pusher.com, choose the Beams product by clicking Get started.
- Enter the Instance name and create the instance. You can enter any value you want.
- From the left menu of the dashboard click Keys, copy the Instance ID and Primary key.
- Enter the ContactCenter admin area, go to Settings > Notifications > Push notifications, and paste instance ID, primary key.
- You're done.
Activation for users
- Download the service worker file here.
- Upload this file to your site at the following location: https://your-site.com/service-worker.js
- Go to Settings > Notifications > Push notifications > Service Worker URL and enter the URL of the file. Ex. https://your-site.com/service-worker.js.
- You're done.
Information
- Pusher is free to use for up to 1000 concurrent subscribers. While you should be able to use the free plan for the admin area and all the agents, you may need a paid plan for Push notifications sent to the users depending on your site traffic.
- Push notifications are currently not supported on iPhone and iOS devices. Push notifications are supported only on Mac, Windows, and Android devices.
- Push notifications only work for full HTTPS websites. The only exception is localhost to ease development.
- When a user click the notification the last page visited by the user is open and the chat is open automatically.
- On desktop the browser needs to be running since that is the process that receives the push messages.
- When push notifications are active, they replace desktop notifications.
- On Android and mobile devices, desktop notifications may not work, in which case you need to use push notifications.
- If Push notifications are active and not working, disable them and try again.
- Push notifications can not be received on a desktop PC unless a browser is running.
Push notifications for admin and agents
- When an agent click the notification the admin area is open and the right conversation is selected. If the admin area is already open the notification will not open a new tab.
- When a user sends their first message, a Push notification is sent to all validated agents; subsequent notifications are sent only to the last agent in the conversation.
- If you're using the Dialogflow App, and Settings > Dialogflow > Human takeover is active, no notifications are sent if the chatbot knows the answer.
- If the Routing setting is active, only the agent assigned to the conversation receive the notification, admins see all conversations but don't receive notifications.
- If the Queue setting is active, only the agent assigned to the conversation receive the notification. Notifications are not sent for messages sent by the user while waiting in queue. Admins see all conversations but don't receive notifications.
- If a user conversation is assigned to a department, only the agents assigned to that department receive the notification.
- If a user conversation is not assigned to any department, only agents with no assigned department receive the notification.
- Notifications are not supported on iPhone and iOS devices.
- Notifications are sent only if the last agent in the conversation is offline.
- and Settings > Dialogflow > Human takeover is active, no notifications are sent if the chatbot knows the answer.
- If push notifications are not working, make sure you allowed the notifications, in Chrome you can check this from Privacy and Security > Site settings > Notifications.
Desktop notifications
- Notifications are not sent if the user is viewing a page with include the chat (the user browser is open and visible, and the active page contains the chat).
- Notifications are not supported on iPhone and iOS devices.
- When push notifications are active, they replace desktop notifications.
Text message notifications
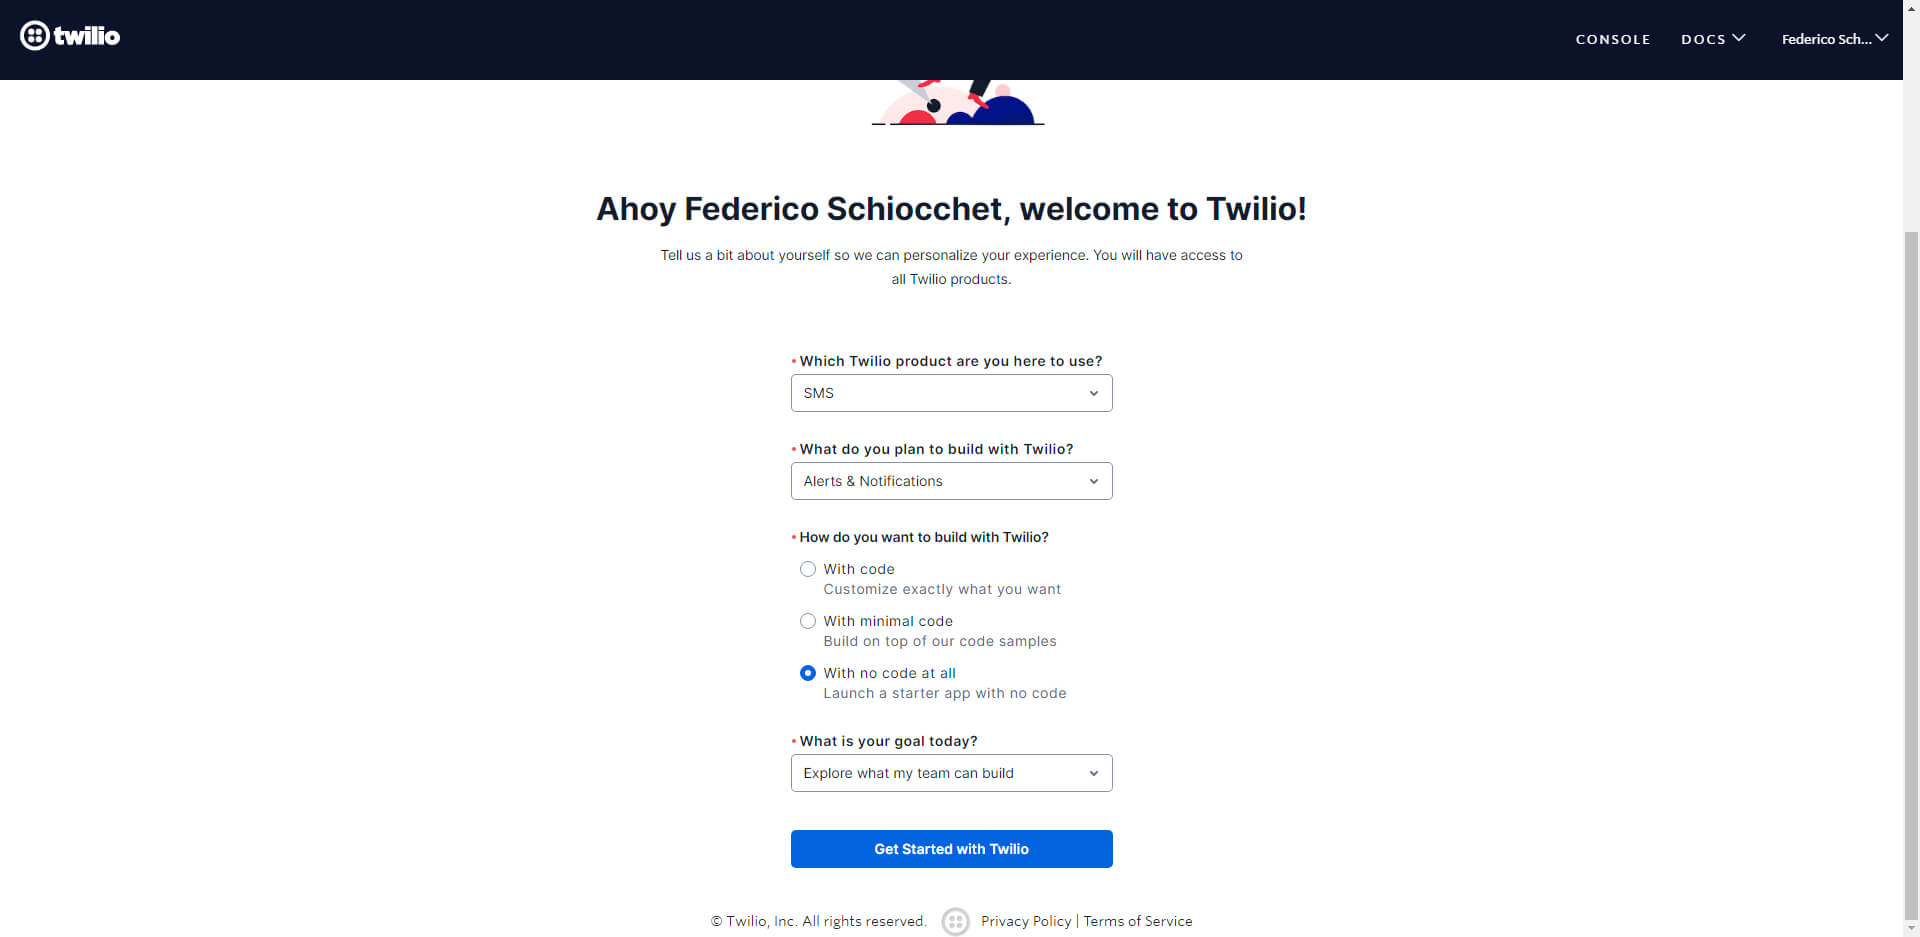
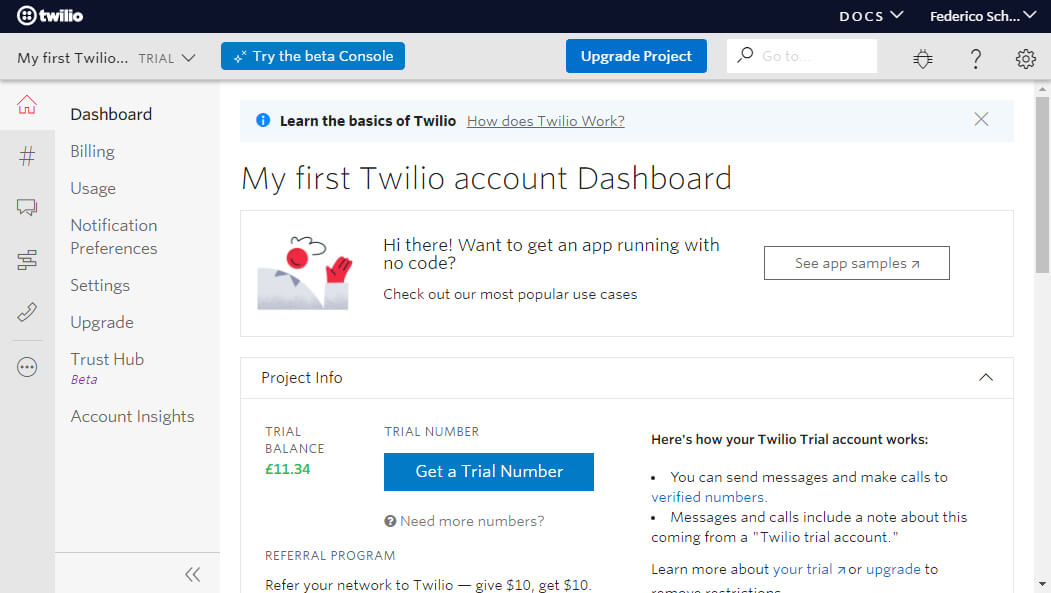
Both agents and users can be notified via text message when a new message comes in. Text message notifications are provided by Twilio. Twilio is a paid service, but it is cheap, and you can use the trial version to test text message notifications for free.
Activation
- Go to https://www.twilio.com and create a new account.
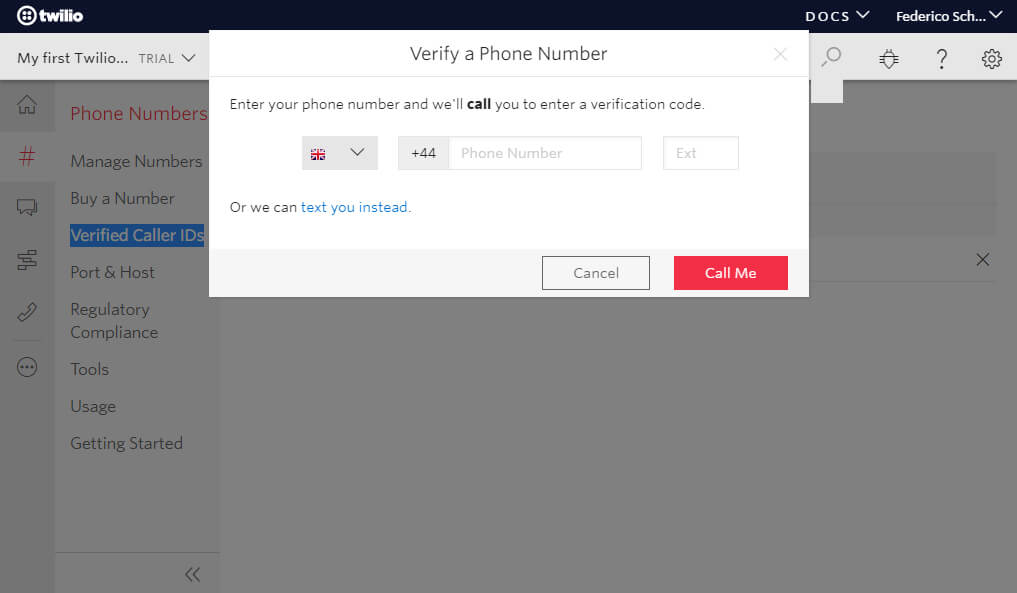
-
Verify your phone number.

-
Complete the form and choose SMS.
-
Once into the dashboard, click Get a Trial Number, then Choose this number.
- Enter the ContactCenter admin area, go to Settings > Notifications > Text message notifications, and paste account SID, auth token, trial number (or a purchased phone number). Find all details in the Twilio dashboard.
-
If you're using the trial version, you can send notifications only to verified numbers.
Enter the Twilio dashboard and click the left button # (Phone Numbers), then click Verified Caller IDs and add your phone number.
-
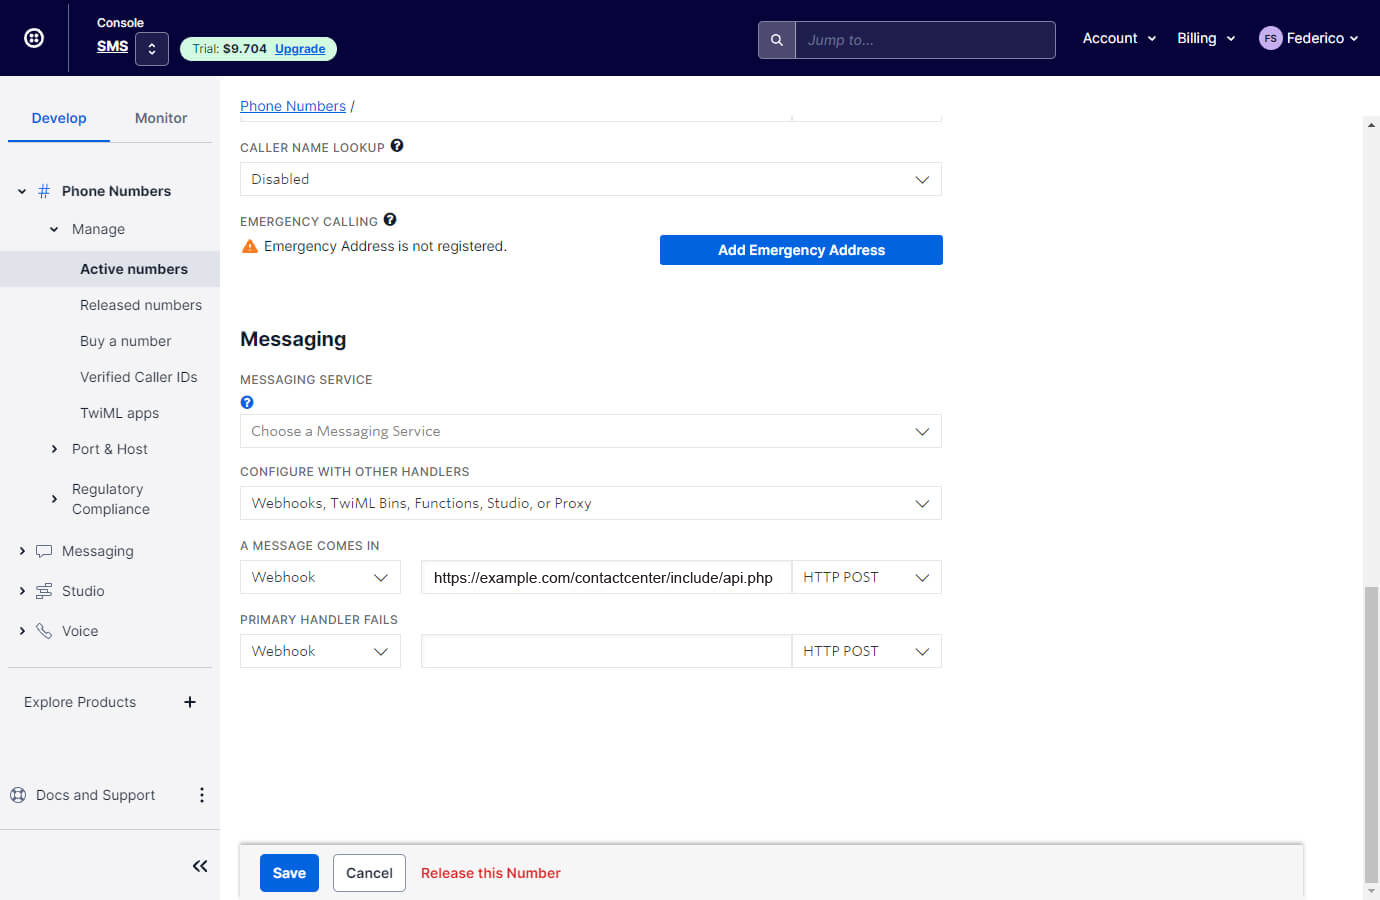
To start using the service live and to receive text messages in ContactCenter you need to purchase a phone number.
After the purchase go to Phone numbers > Manage > Active numbers, click your number, and enter the URL of ContactCenter ,
get it from ContactCenter > Settings > Notifications > Text message notifications > Get configuration URL.
- You're done.

Information
- All phone numbers must have the country code starting with the symbol + (eg. +15558675310).
- You can get the user's phone number via registration form, follow-up message, subscribe messageor, or via [email] shortcode. You can manually enter the user phone from the admin area or via API.
- When a user sends their first message, if the conversation is assigned to a department, a test message is sent only to the agents assigned to that department, if the conversation is assigned to a specific agent, a text message is sent only to that agent, otherwise an text message is sent an email is sent to all agents who are not online at the moment. Subsequent text messages are sent only to the last agent in the conversation.
- Text message notifications are sent only if the last agent in the conversation is offline.
- If you're using the Dialogflow App, and Settings > Dialogflow > Human takeover is active, no text messages are sent if the chatbot knows the answer.
- To use the Sender ID feature enter the sender name in the Sender number field.
Sound notifications
- Sounds work only after the user or agent interact with the document (the user or agent clicked somewhere).
OPENAI
The settings below are related to the Artificial Intelligence app.
Synchronization
The settings below are related to the Artificial Intelligence app.
OpenAI (ChatGPT) integration gives your chatbot the ability to answer general questions about almost anything you can imagine. To start using it, follow the steps below.
- Register at https://beta.openai.com/signup.
- Get an API key from https://beta.openai.com/account/api-keys and paste it into Settings > Artificial Intelligence > OpenAI > API key
- Enable the chatbot from Settings > Artificial Intelligence > OpenAI > Chatbot.
Information
- If OpenAI is not working, click here.
- If you want to send only the latest user message and prevent all previous conversation messages from being sent to OpenAI, you can select the option Omit previous messages. If OpenAI is unable to reply after a few user messages, you can try checking this option and attempting again.
- If Dialogflow is active, the OpenAI query is performed only if the chatbot does not know the answer to the user's question and if the length of the user's message is greater than 4 characters.
- The following settings are compatible with OpenAI: Smart reply, Human takeover, Disable for the tickets area, Disable during office hours, Bot response delay, Reply to user emails, Reply to user text messages.
- The following Google settings are compatible with OpenAI: Multilingual, Multilingual via translation, Automatic translation, Language detection
- If a human takes control, the OpenAI chatbot is deactivated, and is remains deactivated also if the agent goes offline. The Dialogflow chatbot continues to function whenever necessary.
- The default model is gpt-3.5-turbo-instruct.
- OpenAI supports the use of voice messages through speech recognition.
Settings
See information about most OpenAI settings here.
Chatbot
The OpenAI chatbot feature functions similarly to Dialogflow, providing automated responses to user messages. Select the Chatbot mode setting to specify the questions that the chatbot is capable of responding to. Utilize the human takeover feature to enable the chatbot to redirect the chat to a human agent as necessary.
Fallback message
The fallback message is sent when OpenAI is unable to understand the user question. If the Dialogflow chatbot is enabled, the fallback message will be turned off and the Dialogflow chatbot's fallback message will be utilized instead.
Prompt
The prompt instructs OpenAI on how to respond by providing relevant information that can be utilized to answer user inquiries. To comprehend the process, refer to the example prompts listed below.
Prompt - Message rewriting
This prompt instructs OpenAI on how to rewrite a message when the Message rewrite button is active. This prompt should be in English. Contact Center automatically add the following text when required: and use the user langauge, add greetings.
Replies from the training sources can be utilized with the prompt feature as they are compatible.
If you choose to activate the human takeover feature, you need to include a particular phrase in your query to prompt OpenAI to respond with I don't know if it is unable to provide an answer to the user's question. For example you can use: Respond "I don't know", if not sure about the answer.
Spelling correction
This feature automatically fix any spelling mistakes in the agent's message.
Dialogflow spelling correction
In the case where Dialogflow is unable to find the appropriate response to the user's message, this function verifies if there are any spelling errors. If any such errors exist, Dialogflow is prompted again with the correctly spelled version of the message for an accurate response. Although it has a higher priority, this feature can still work together with the Google Search spelling correction feature.
Message rewrite button
This feature adds a button to the text field of the conversation area, click on it to rewrite your message and make it more friendly and professional. Greetings will be added automatically if there is no previous agent messages. If your language is not English, you have to edit your agent/admin profile and set the correct language.
OpenAI parameters
Contact Center allows you to adjust various OpenAI parameters such as temperature and logit_bias, for more details visit https://platform.openai.com/docs/api-reference/completions/create. Don't set any values if you don't know what these parameters do or OpenAI may stop working.
Generate user expressions - Option
When this option is active, OpenAI will generate new user expressions in real time when you open the chatbot training window.
Generate user expressions - Button
When you click the button Generate user expressions, openAI will update your Dialogflow agent and generate new user expressions for each Intent.
- Make a backup of your Dialogflow agent first.
- This task can take several minutes or even hours if your chatbot has a lot of Intents. Since the operation takes a long time, your server may interrupt the operation (operation timeout) before it finishes, in which case you need to click the button again. You can verify if the operation is interrupted by checking the browser console for errors.
- This task is performed only once per Intent. Previously processed Intents will be ignored.
- This task checks existing user expressions and does not create duplicates.
- The first 5 user expressions will be used to generate new user expressions.
- Since this is an automated process, we strongly recommend reviewing your Intents after the task has been completed.
Training
With this feature, your chatbot can undergo training using your website texts or PDF documents. Once the training is successfully completed, the chatbot will be able to answer questions related to your contents.
- To initiate the chatbot training, input the URL of your content in Settings > Artificial Intelligence > Open AI - Training Sources. It is possible to enter URLs for websites, text or PDF files, or XML sitemaps. PDF and text files can also be uploaded from Settings > Artificial Intelligence > OpenAI - Training Sources - PDF and Text Files.
- Once the sources are set, click the Train your chatbot button and await completion of the training process.
- You can add and manage personalized question and answers from Settings > Artificial Intelligence > OpenAI - Questions and answers and from the chatbot training window.
Information
- It is only possible to upload files in PDF and TXT formats.
- You can provide the website URL and all child URLs will be included and crawled, but with large websites, it is more efficient and less prone to errors and infinite link loops to utilize an XML sitemap instead of relying on the website URL. You can create it with a service like https://www.xml-sitemaps.com.
- If you want to train your chatbot using specific pages from your website instead of all of them, you can make use of an XML sitemap. Create one using a tool like https://www.xml-sitemaps.com, and then remove the pages you do not wish to include by editing the file in a text editor. To use the XML sitemap, you need to upload it either onto your server or an external online location. Afterward, add the URL of the sitemap in Settings > Artificial Intelligence > OpenAI - Training sources.
- You can upload large files and your XML sitemap with a service like https://tmpfiles.org.
- If you are training OpenAI with a multi-language website, you can limit the chatbot to retrieve answers only from the pages in the user's language. To activate this feature, go to Settings > Artificial Intelligence > OpenAI > Multilingual Training Sources. For Contact Center to comprehend the language of your web pages, the <html> must contain the attribute lang.
- As soon as the training is completed, the uploaded files are removed. Every time you need to retrain the chatbot, you are required to upload all the necessary documents for its training once again.
- To add new training sources, simply train the chatbot again. The previous training sources will not be lost, and only the new sources will be added.
- The Contact Center articles are used as training sources automatically.
- The ADA embedding model is essential for training your chatbot and handling all user messages. It is necessary for these scenarios and cannot be disabled. Please note that the ADA Embedding model is different from the ADA model and is available at a much lower cost. You can find pricing information at https://openai.com/pricing. Check out the pricing for the Ada model in the Embedding models section.
- The responses generated by OpenAI have the feature to include in the reply a link to the corresponding website page where the answer was sourced.
- Click Delete training to remove all previous training data for the chatbot.
ARTIFICIAL INTELLIGENCE
The settings below are related to the Artificial Intelligence app.
Human Takeover
General information
- When the human takeover is activated the chatbot is automatically disabled for as long as the agent is online. After that, the chatbot is activated again but no default fallback messages will be sent within 10 days of human takeover if the chatbot doesn't know the answer to the user's question in the same conversation. You can force a Dialogflow message to be always sent by adding to the Intent the custom Payload value "force-message": true.
- The OpenAI chatbot is disabled for 10 days, and it will continue to remain inactive even if the agent is offline.
- The chatbot is fully activated again when the conversation is archived or deleted.
- If you're using Slack, no messages will be sent if the chatbot knows the answer. Once the human takeover is active all conversation's messages are sent to Slack.
- When a human agent reply to a user the human takeover is activated automatically.
- The human takeover feature is compatible with OpenAI and will continue to function even if the Dialogflow chatbot is deactivated.
- To fully disable the chatbot on human takeover, check the option Human takeover > Disable chatbot.
- If the human takeover is already active, it will not be activated again, and the human takeover message will not be sent.
Human takeover option
When the option Human takeover is active the following happens:
- If enabled, the request is sent only if the message sent by the user is longer than 3 chars and contains at least two words. This optimization prevents mistaken requests.
- The conversations to which the chatbot was able to answer correctly, are marked as read and moved at the bottom of the Inbox list.
When the user confirms the human takeover, or if it is automatic, the following happens:
- The conversation is marked as unread and moved on top of the Inbox.
- Any future user messages in the same conversation sent within 10 days of the human takeover, and without an answer from the chatbot, will trigger agent notifications.
- If agents email notifications are active, an email notification is sent to the agent assigned to the conversation, or, if the user's conversation is assigned to a department, to the agents assigned to that department, otherwise it is sent to all offline agents.
- If push notifications are active, a push notification is sent to the agent assigned to the conversation, or, if the user's conversation is assigned to a department, to the agents assigned to that department, otherwise it is sent to all offline agents.
- If text message notifications are active, a text message is sent to the agent assigned to the conversation, or, if the user's conversation is assigned to a department, to the agents assigned to that department, otherwise it is sent to all offline agents.
- No human takeover requests within 10 days of the human takeover will be sent in the same conversation.
- If the follow-up message is active, the message requesting the user's email is sent only if the user does not have the email.
- If the offline message is active, the offline message is sent only if it is not office hours or if all agents are offline.
- If the queue is active, the queue is activated.
Manual human takeover - Dialogflow Only
- You can manually trigger the human takeover by creating a new Dialogflow Intent with the following Custom Payload response: { "human-takeover": true }.
- The manual takeover automatically notify agents via email and leave the conversation marked as unread.
- To manually send a human take over request use the chips rich message with ID sb-human-takeover. Ex. [chips id="sb-human-takeover" options="Human support,Cancel" message=""].
WhatsApp, Messenger, Telegram
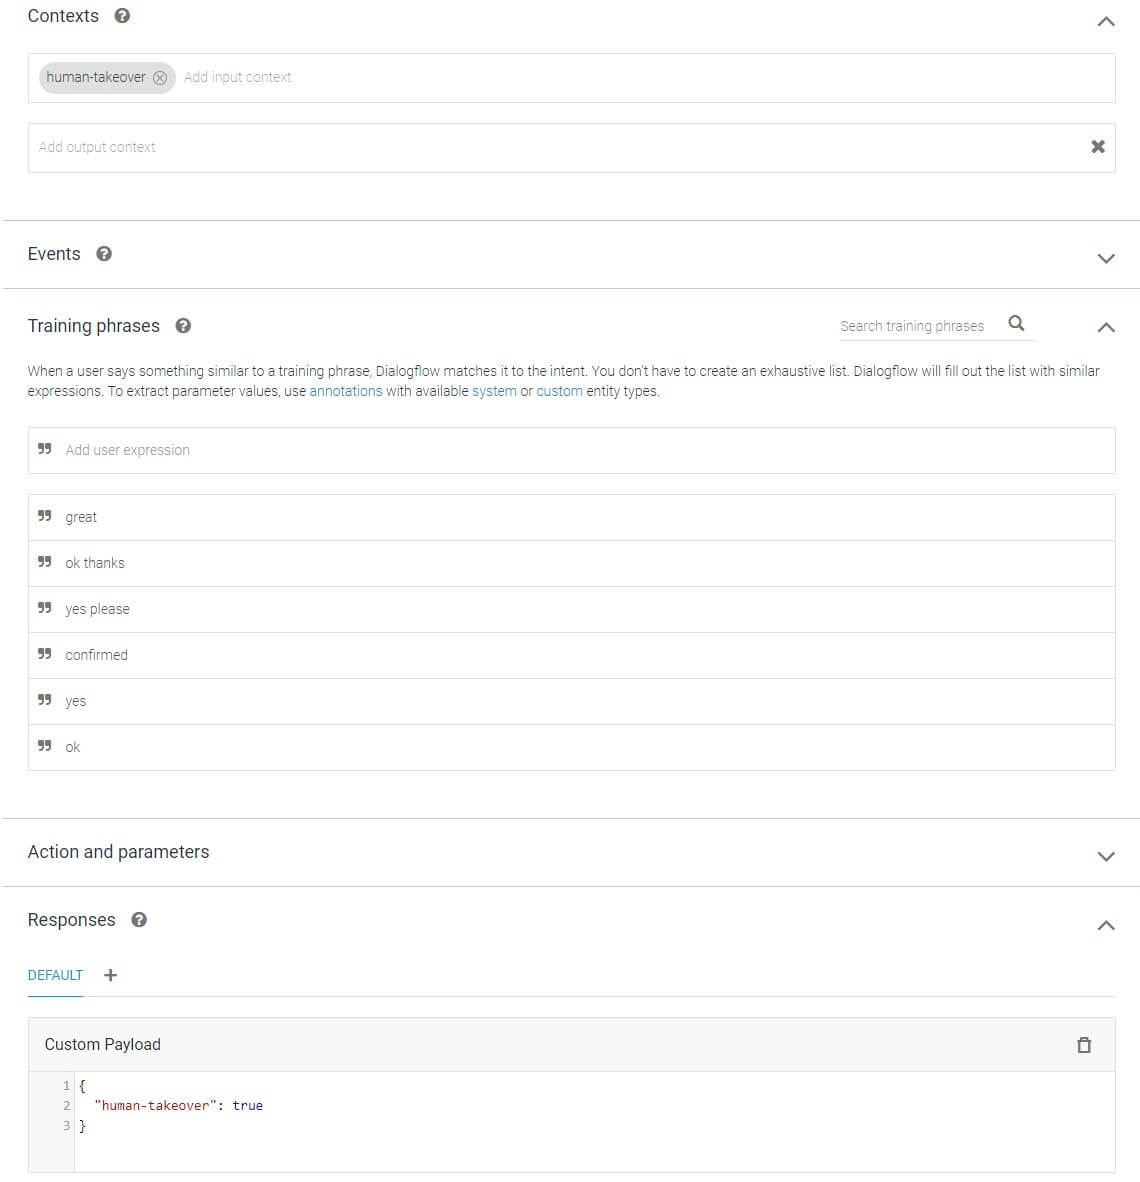
The make the human takeover request work on WhatsApp, Messenger, Telegram and the other messaging apps, you need to create a
new Intent with human-takeover as input Context, nothing as output Context, a
list of the user's most common confirmation messages as Training phrases(e.g. ok, yes)
and { "human-takeover": true } as Custom Payload response
 .
.
Smart Reply
Smart Reply suggests quick responses in real-time during a conversation. Once active, you will see the suggested replies in the conversation area, if any.
Information
- The Smart Reply feature initially checks for suggestions from the Dialogflow chatbot, provided it is active. If there is at least one suggestion, it will promptly display the results. However, if Dialogflow is inactive, or there are Dialogflow suggestions, the OpenAI suggestions will be returned instead.
- If the Language detection feature under Settings > Artificial Intelligence > Google > Language detection is active, the smart replies will use language detection as well.
- If the multilingual via translation feature is enabled, the smart replies will utilize multilingual translation as well.
- To read the complete text of a smart reply, hover the mouse pointer over it for a duration of 3 seconds.
- To restore the previous message, press the keyboard shortcuts CTRL + Z.
Optimal configuration for the chatbot
ContactCenter provides powerful tools to assist you in the process of creating the chatbot.
- Activate Artificial Intelligence > Google > Dialogflow chatbot. If you have general or specific inquiries that require a definitive response, the Dialogflow chatbot is the best option and it can work alongside the OpenAI chatbot. The Dialogflow and OpenAI chatbots can work together simultaneously. More details here.
- Keep improviding the chatbot from the chatbot training window.
- Activate Artificial Intelligence > Smart Reply. More details here.
- Activate the following OpenAI settings: Chatbot, Spelling Correction, Dialogflow spelling correction, Rewrite Message Button, and Generate User Expressions. More details here.
- Train your OpenAI chatbot with your own content, more details here.
- Set the value of Google > Dialogflow Intent detection confidence to 0.81.
- If your website receives traffic from multiple countries, consider activating the following Google options: multilingual via translation, automatic translation, language detection.
- Change the chatbot name from Settings > Users > Bot name.
Having Problems?
If you're having any issues at all, please contact our support team via the chat widget on right of this page. Before contacting us, please make sure that your server has all the requirements listed above.
Blocking zoom on iOS devices
When using the chat on iPhones the textarea is automatically zoomed when the user's start typing a new message. To stop the zoom Enter the code below into the <head> area of all the pages that include the chat.
	<meta name=
	"viewport" content="width=device-width, initial-scale=1, maximum-scale=1.0, user-scalable=no"
	 />
Chat widget not displaying
The chat may not be showing due to the following reasons.
- You cannot see and test the chat as a user if you're logged-into the admin area. To test the chat as a user, please log out of your admin account. Alternatively, you can use another browser window in "private" or "incognito" mode. Additionally, you can force a logout by executing the SBF.reset() function in the browser console.
- You may not see the chat because you have disabled it in the settings area. To fix this, visit the settings section and deselect all options related to that: Chat > Manual initialization, Chat > Login initialization, Chat > Hide chat outside of office hours.
Conversations are not visible to administrators or agents
The conversations may not be showing due to the following reasons.
- The agent has been given a department, yet the conversations have not been assigned to that specific department.
- One or more of the following settings have been activated: Miscellaneous > Routing, Miscellaneous > Queue, Miscellaneous > Hide conversations of other agents
- You are using the chatbot and the setting Artificial Intelligence > Human takeover has been activated.
For cases 1, 2, and 3, make sure to log in with the correct admin/agent or check your admin/agent profile to ensure that there are no departments assigned. In case 4, please check the archived conversations.
TICKETS
The settings below are related to the Tickets App.
Information
- Tickets are the same of chat conversations and messages, the only difference from the chat is the front-end panel.
- Most of the settings of the chat are compatible with the Tickets App but not all of them. The dashboard settings, the pop-up message, and more are not compatible.
- Dedicated APIs for the Tickets App are available in the API section.
- To remove the mandatory 'New ticket' form for new users, activate the welcome message of Settings > Messages > Welcome message. The welcome message delay is ignored in the tickets area, the message is sent immediately..
- To manually disable the mandatory registration only on a single page use the JavaScript code var SB_REGISTRATION_REQUIRED = true. Set it to true to force the registration instead.
DIALOGFLOW
The settings below are related to the Dialogflow App.
Synchronization
To start using Dialogflow with ContactCenter follow the steps below.
- Go to console.cloud.google.com and sign in.
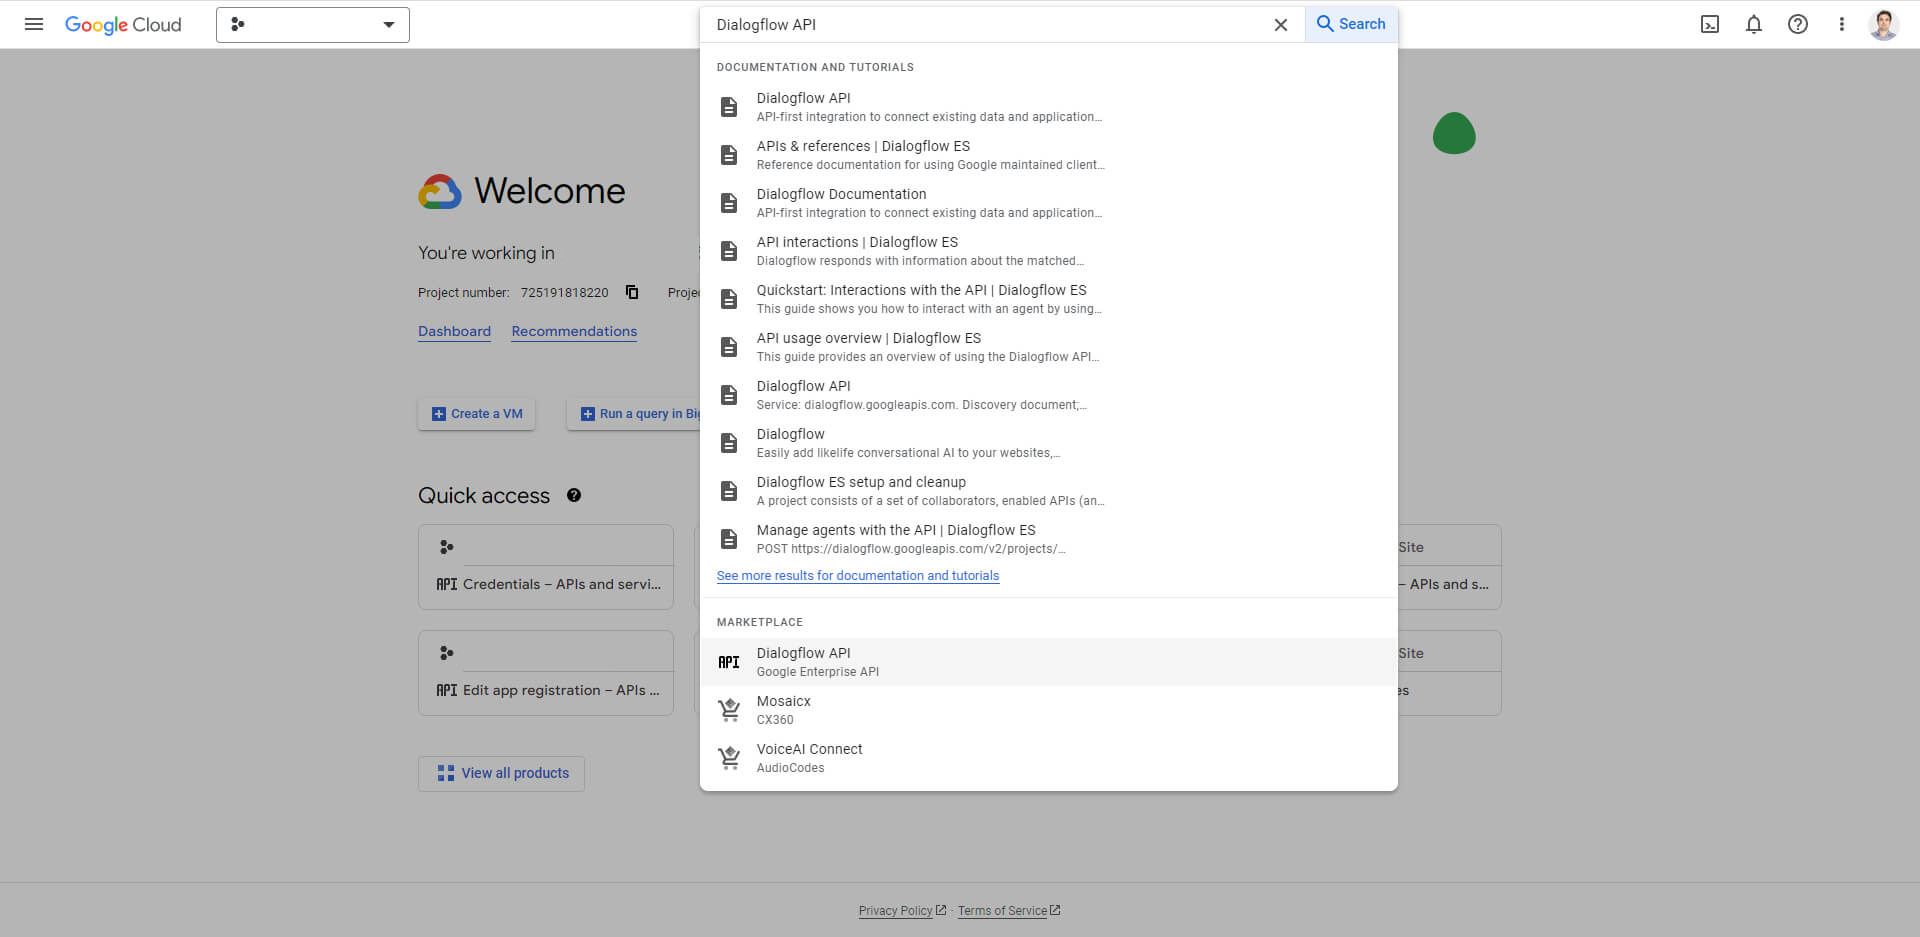
-
Activate the Dialogflow API by entering Dialogflow API on the top search bar. Click Dialogflow API and then click Enable.
-
Create your first project by clicking the Select a project button on top-left. Name the project as you want.
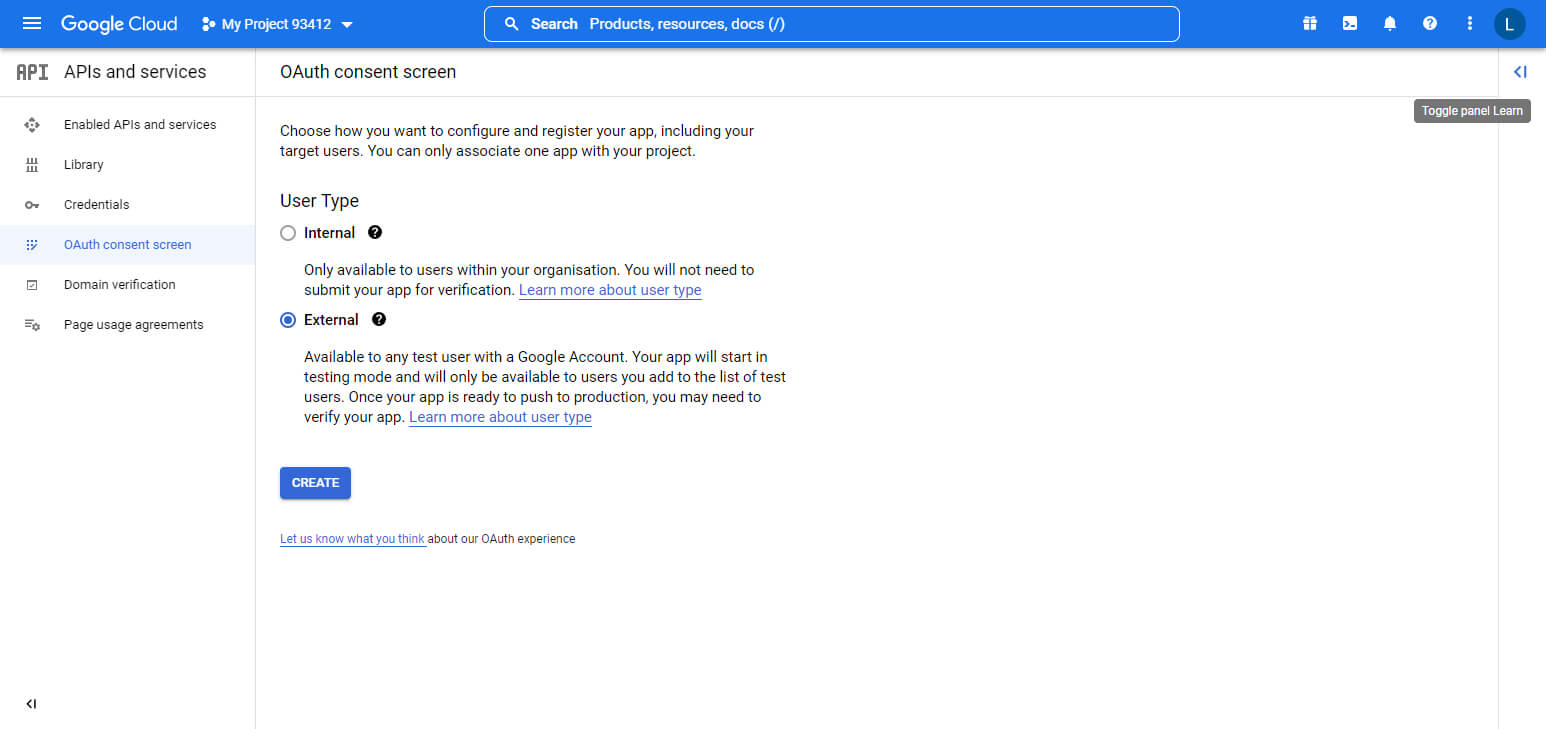
-
Select the project and the go to Left menu > APIs and services > OAuth consent screen.
Select External and click Create.
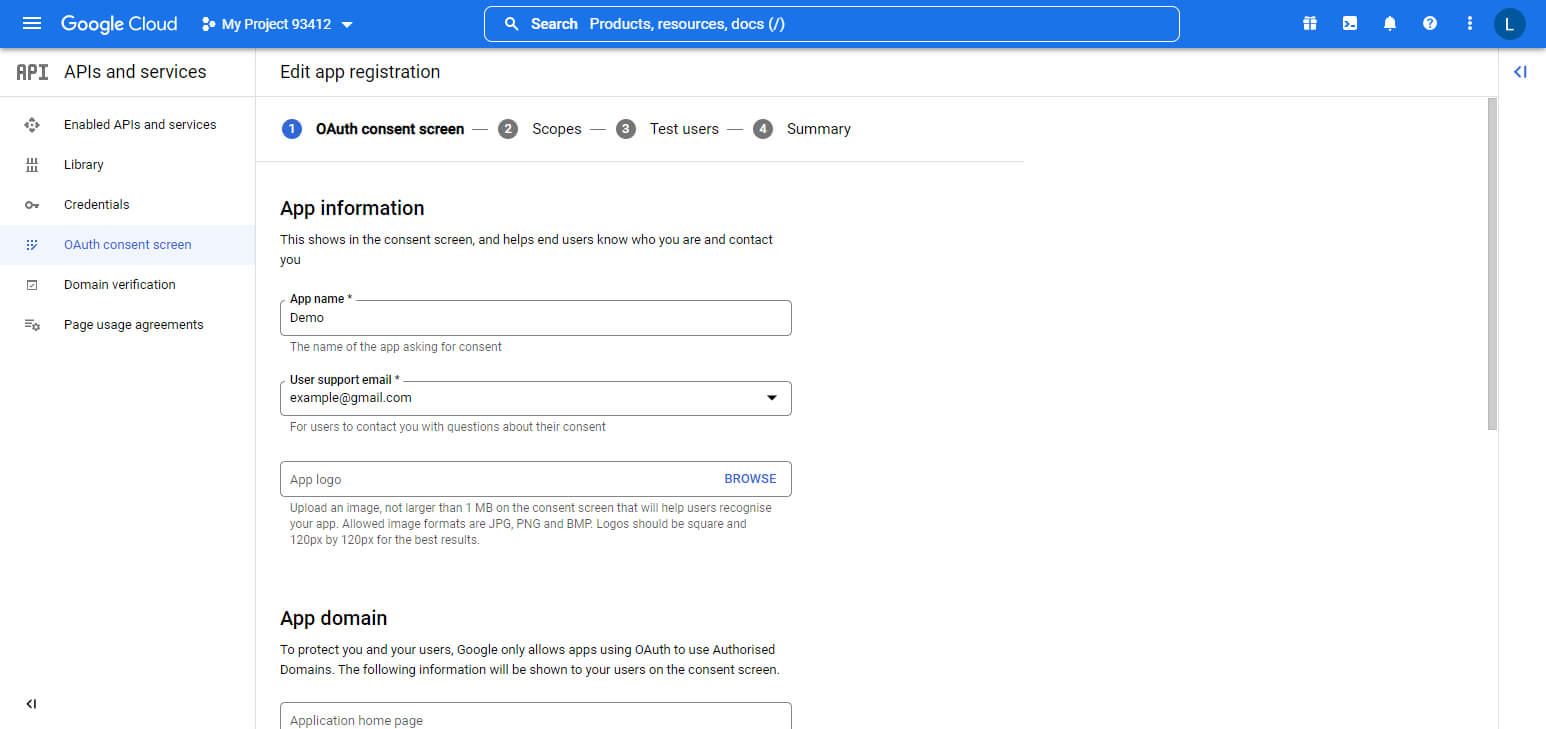
In App name enter what you want, in User support email and Developer contact information enter your email.
Click Save and continue.
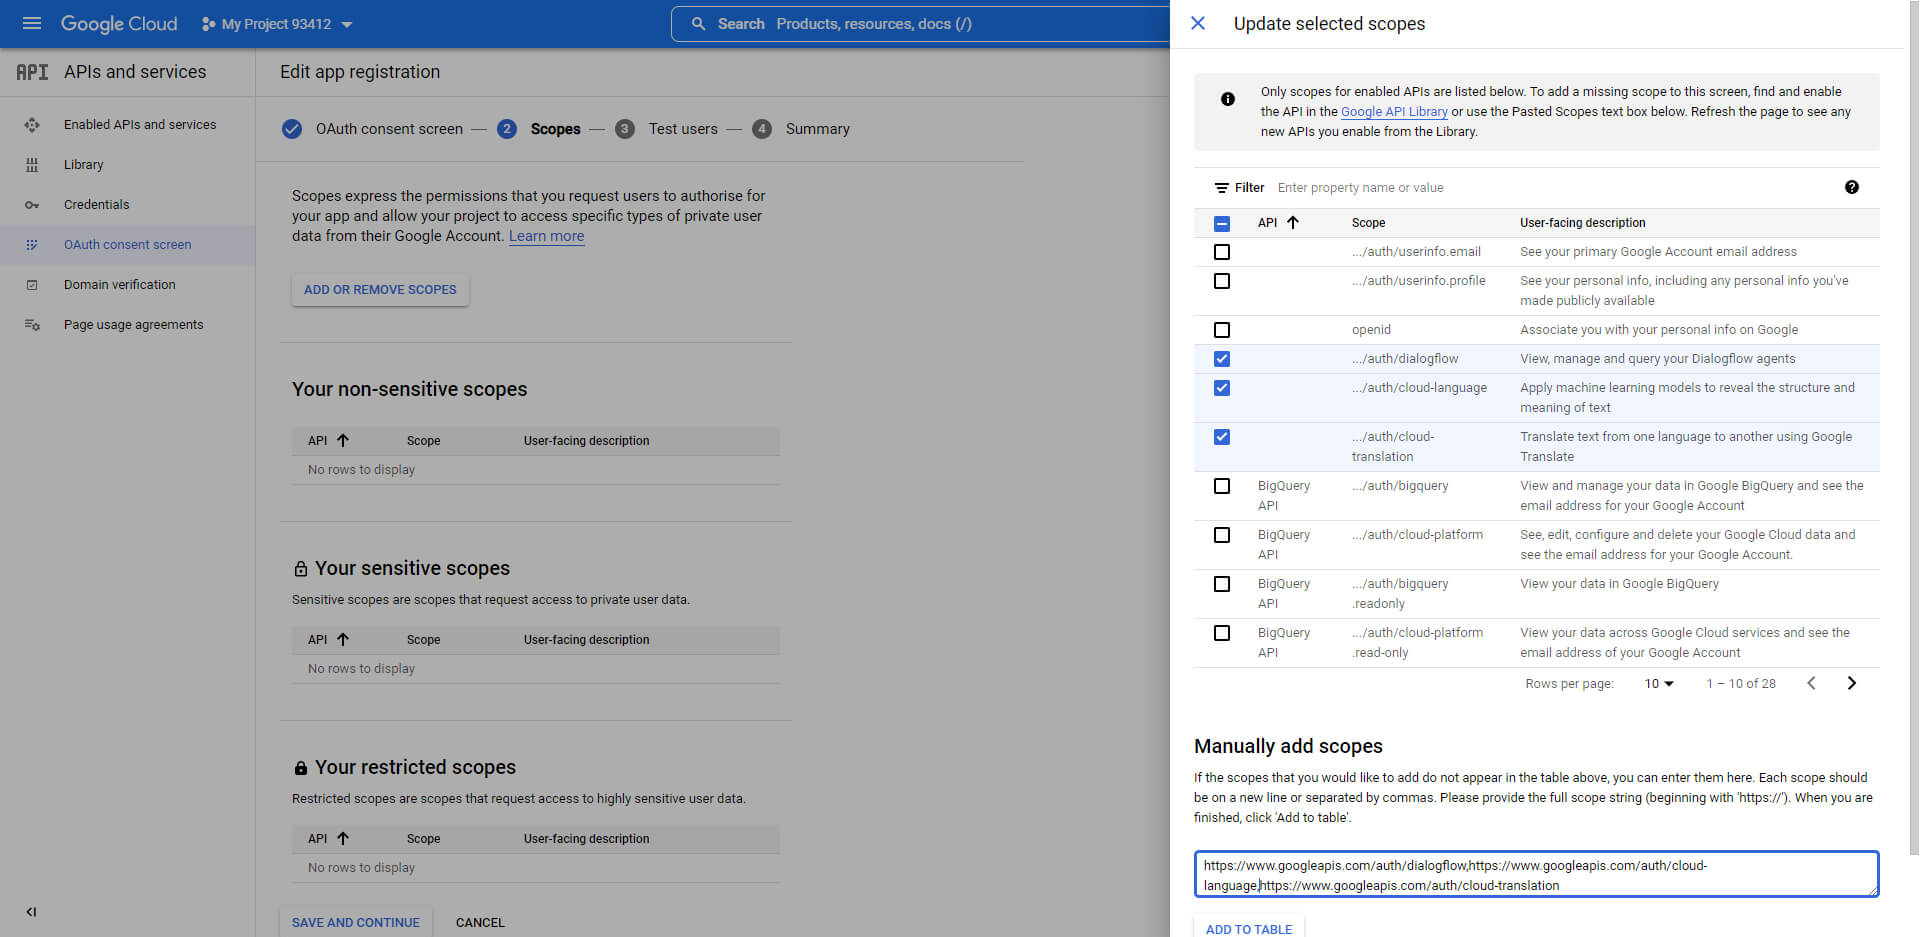
-
In the scopes area, click Add or remove scopes, scroll bottom and into the Manually add scopes area enter
https://www.googleapis.com/auth/dialogflow,https://www.googleapis.com/auth/cloud-language,https://www.googleapis.com/auth/cloud-translation.
Click Add to table and then Update and Save and continue.
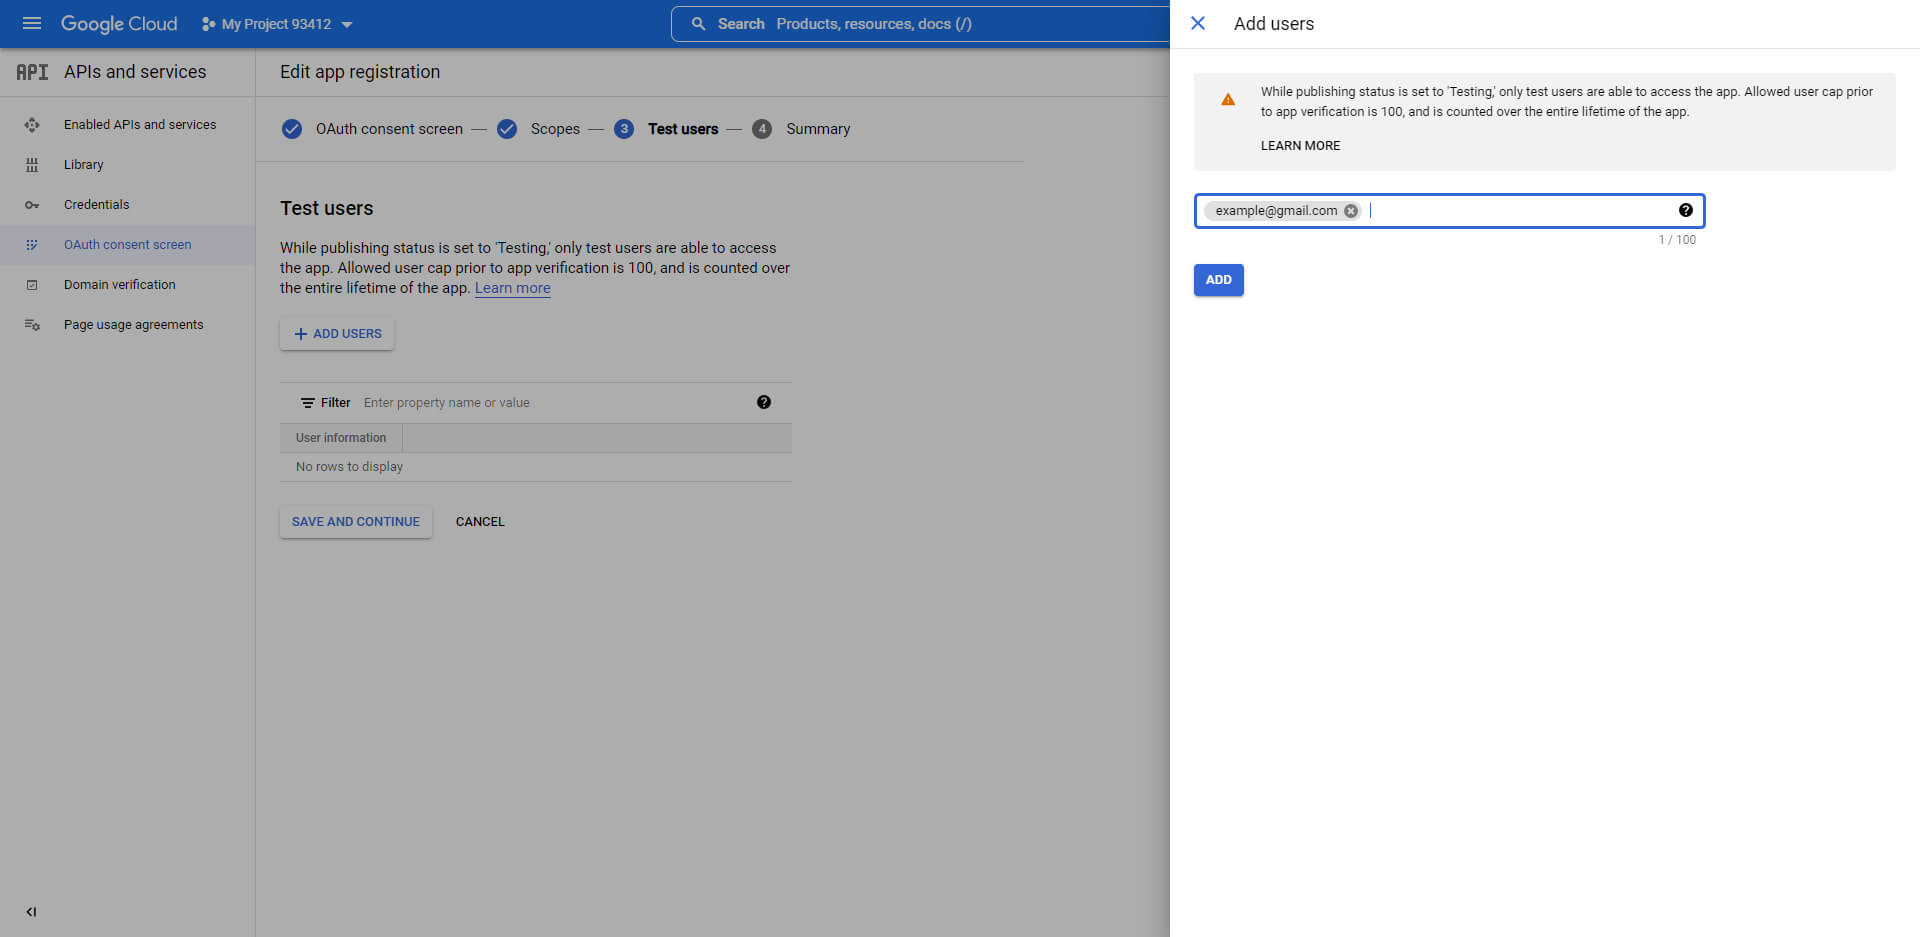
-
In the test users area, click Add users and add your Google email, use the same email as the currently logged in account.
Click Save and continue.
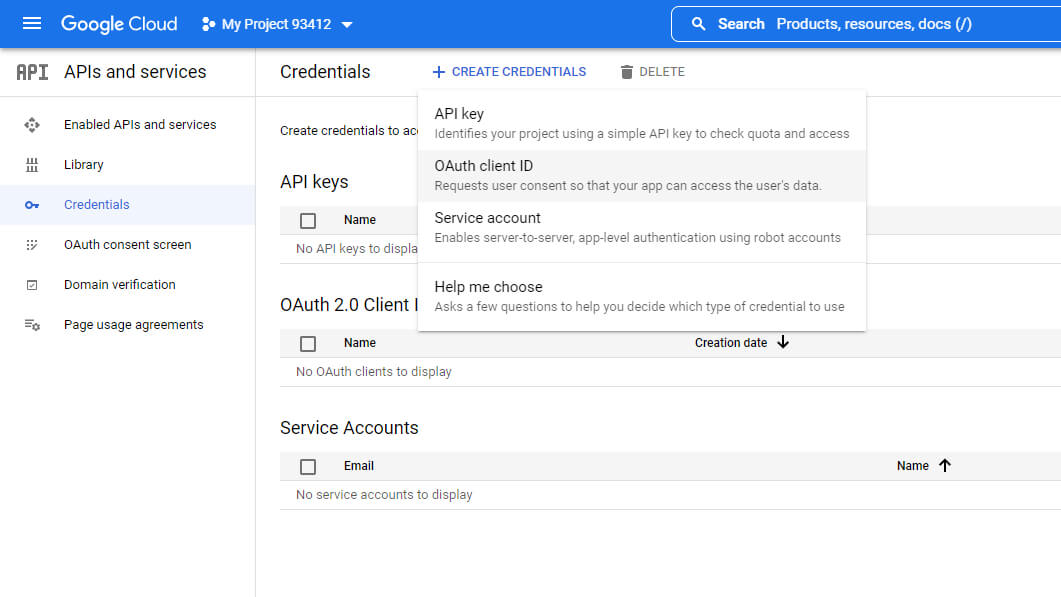
-
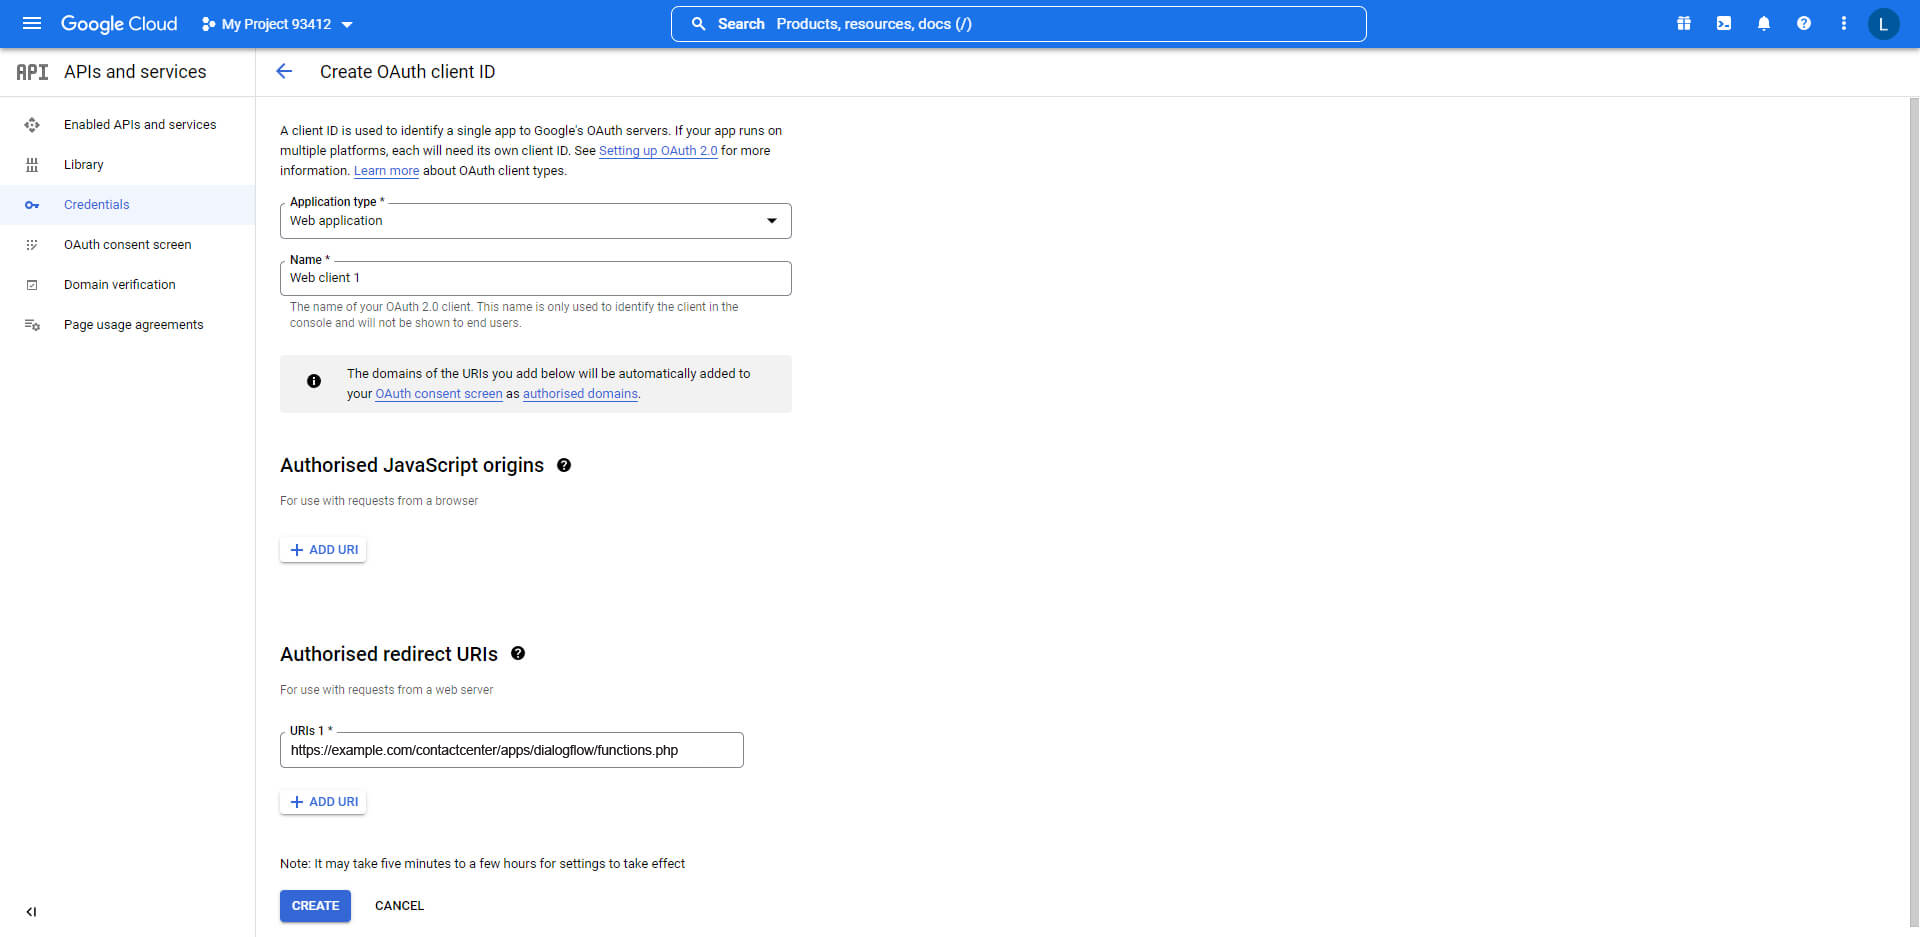
Go to Left menu > APIs and services > Credentials and click Create credentials, select OAuth client ID.
As Application type select Web application. Enter any name you want.
In Authorised redirect URI enter the redirect URL, get it from ContactCenter > Settings > Dialogflow > Synchronization > Authorised redirect URI.
Click Create.
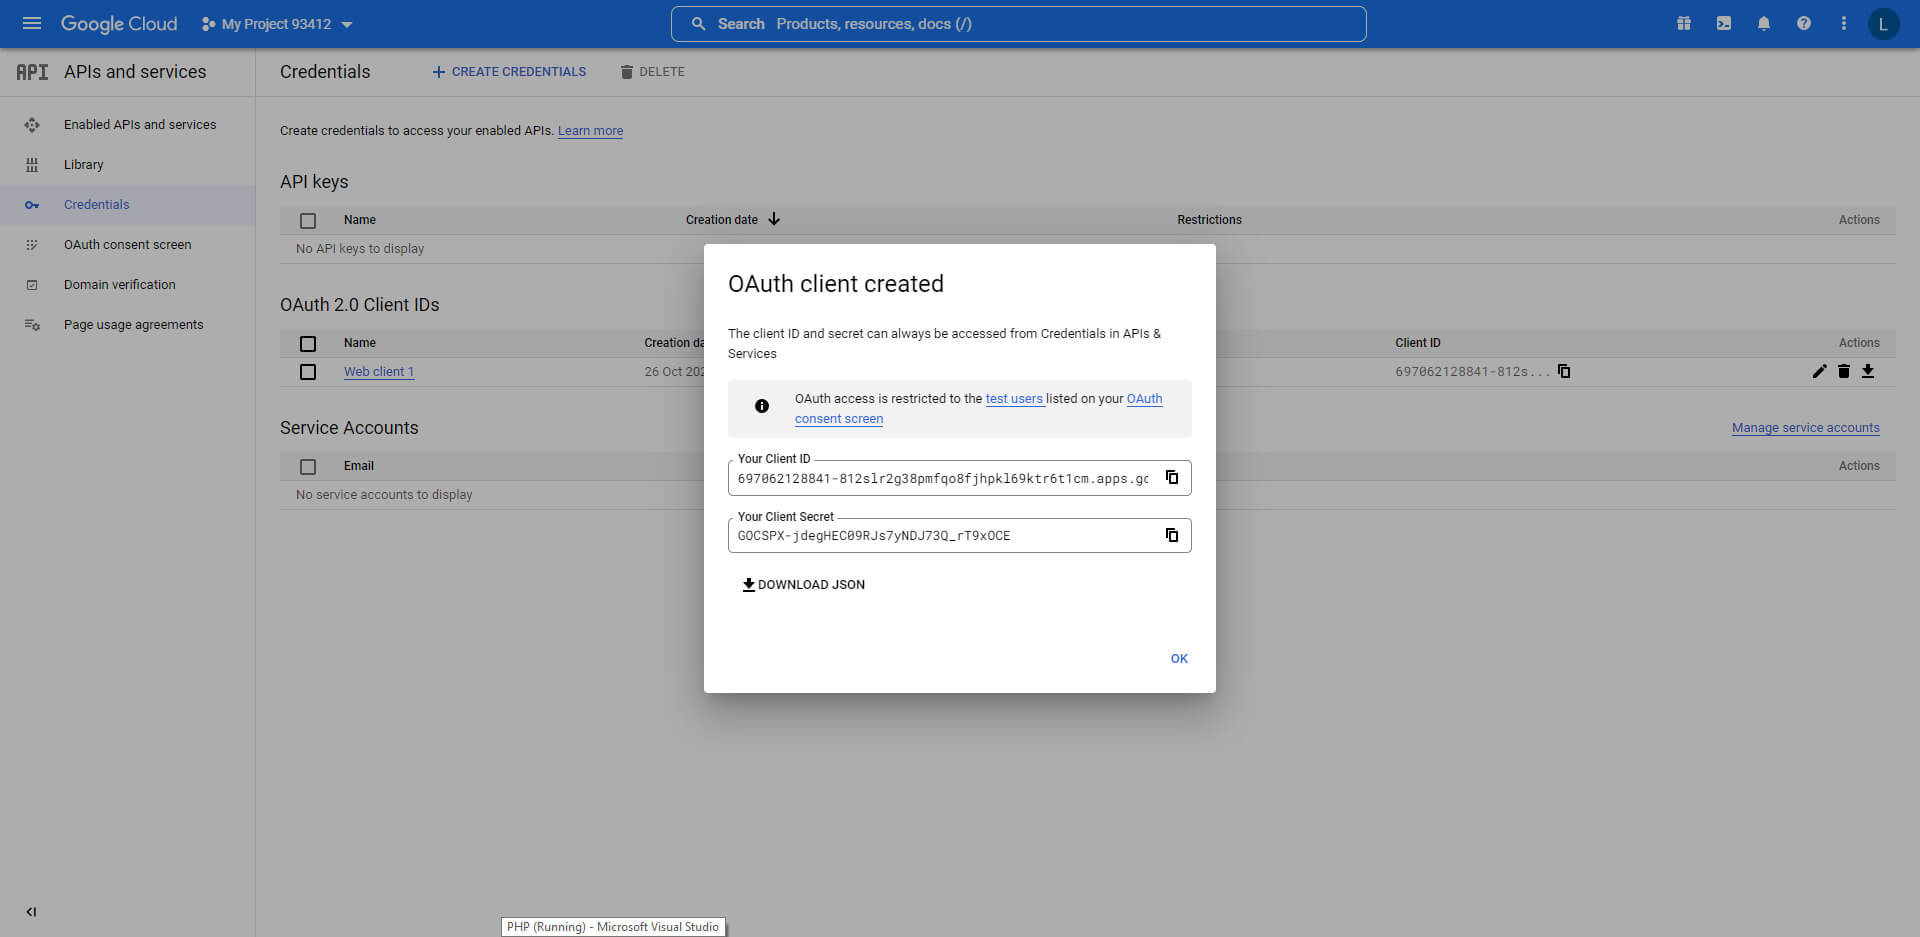
-
Copy Client ID and Client Secret and paste them into ContactCenter > Settings > Dialogflow > Synchronization. Save the settings.
-
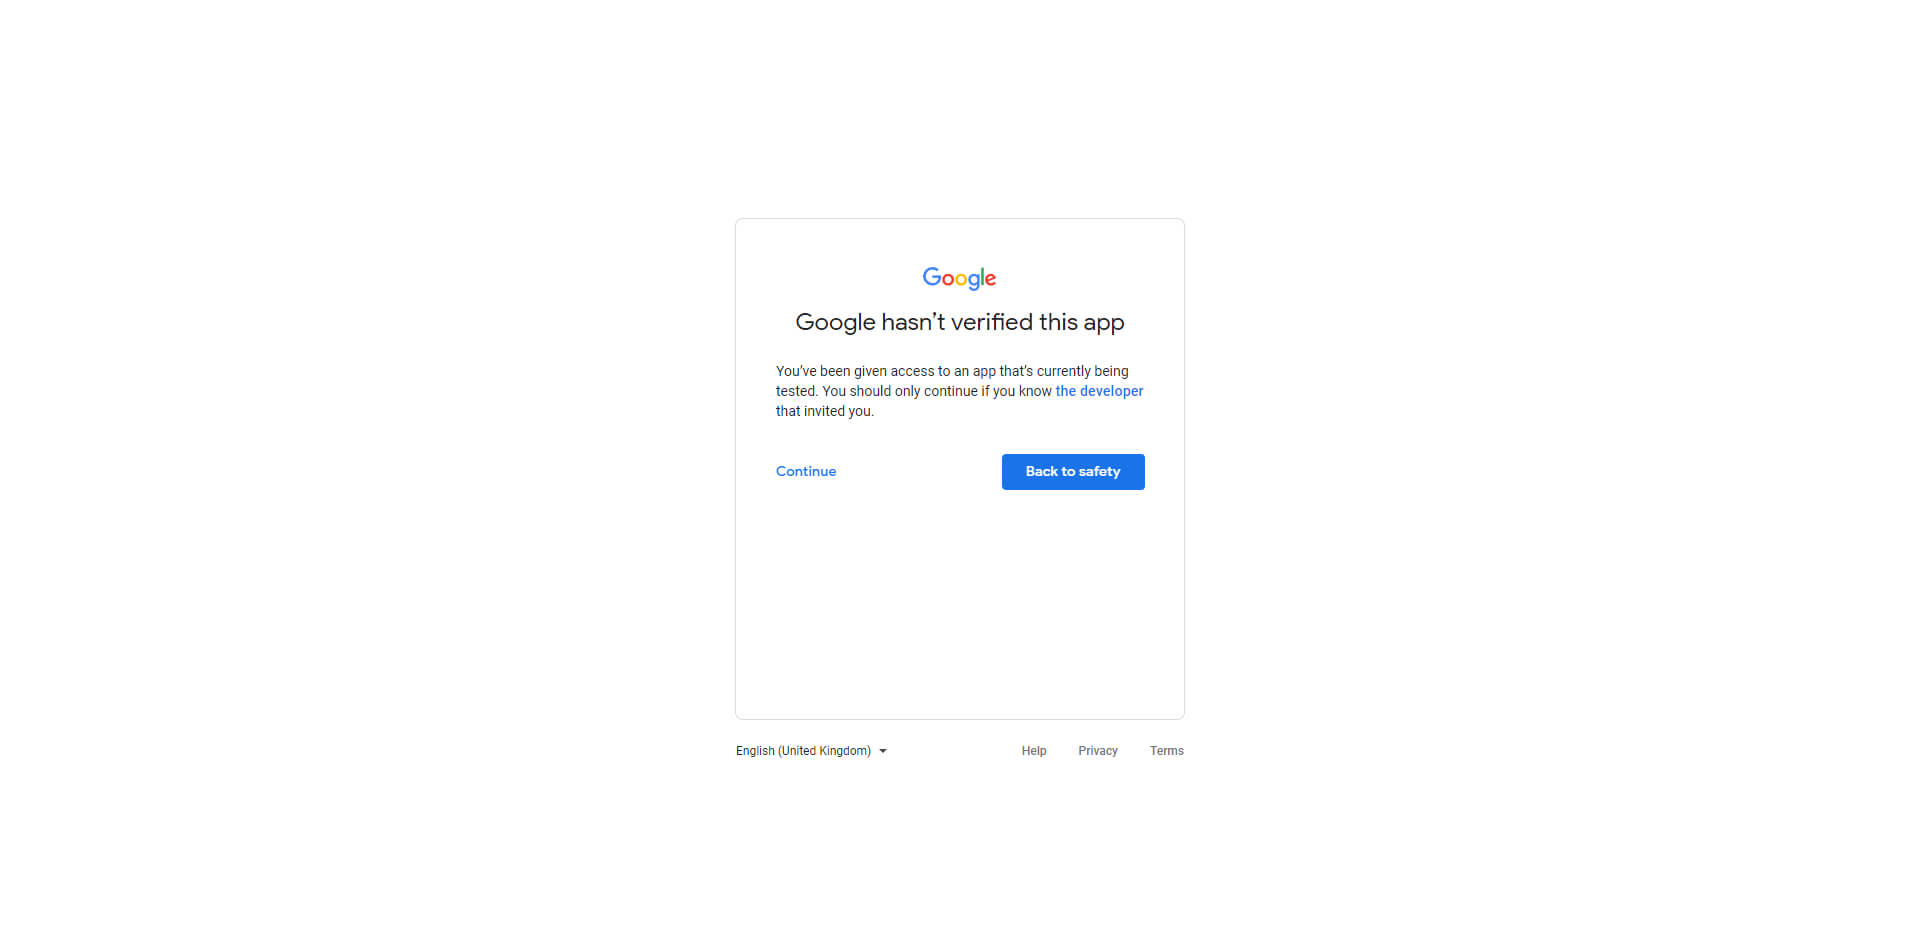
Click ContactCenter > Settings > Dialogflow > Synchronization > Synchronize.
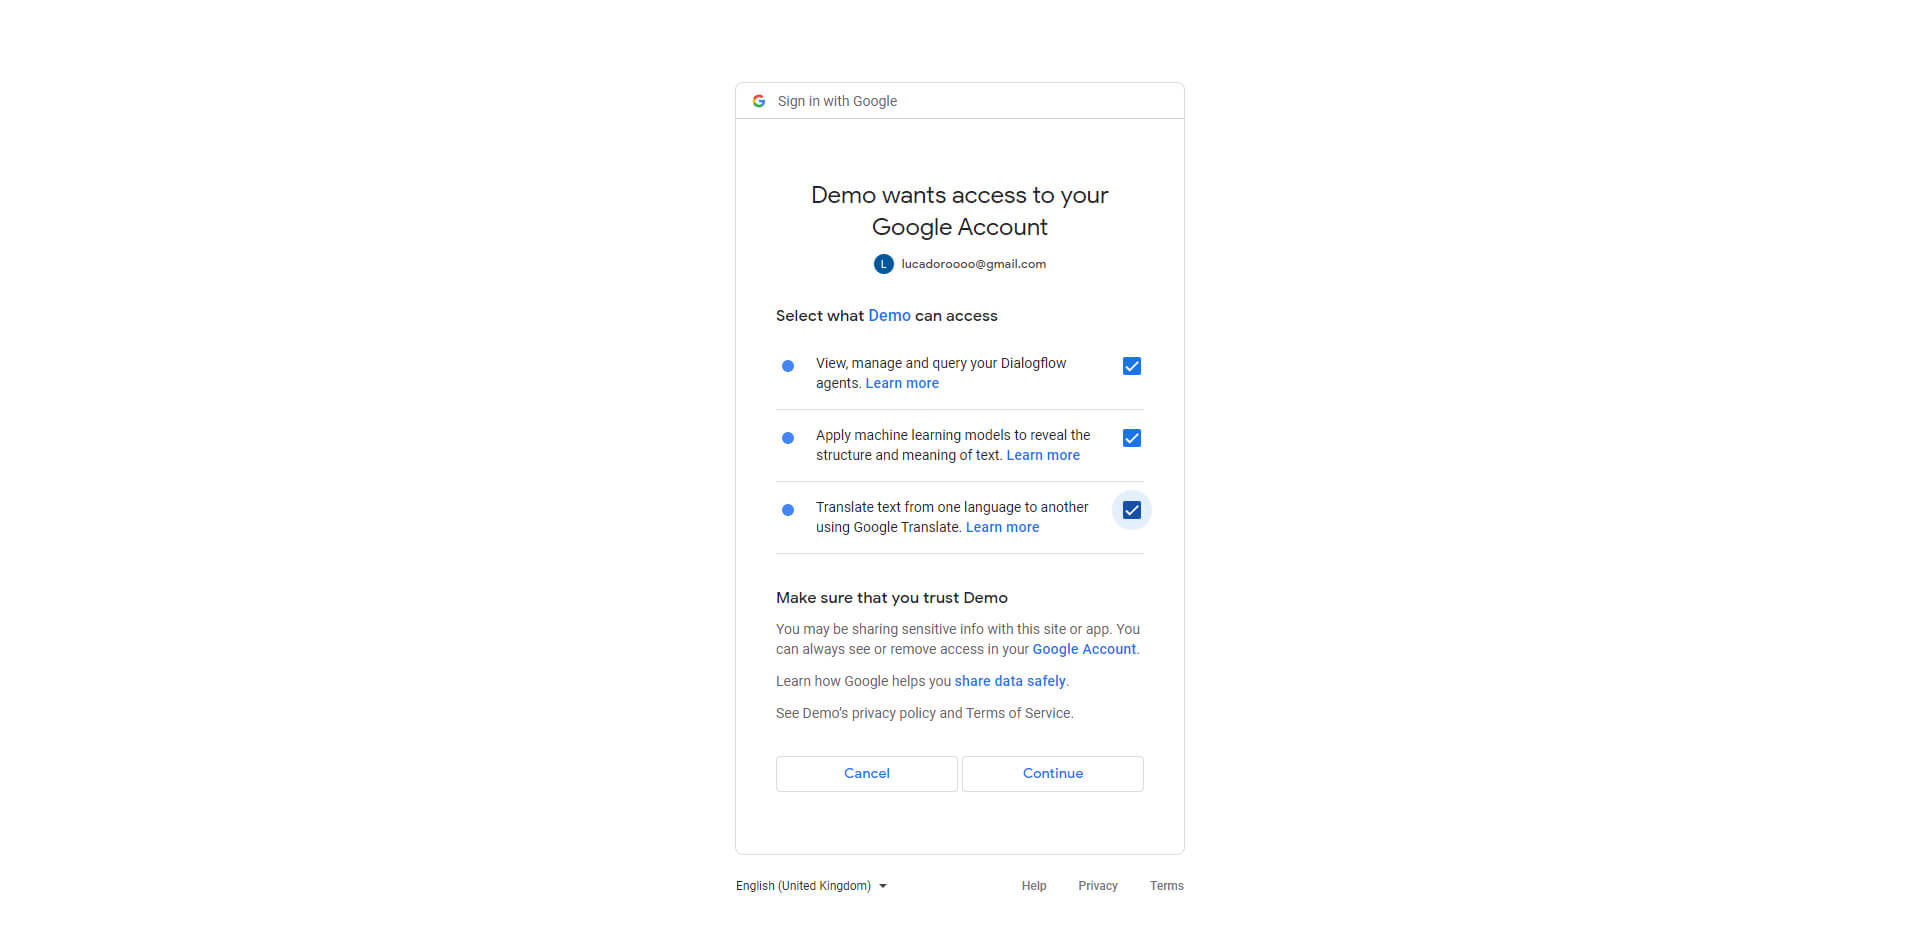
Login with the same Google account you have used till now. On the next screen click Continue.
On the next screen select all scopes and click Continue.
-
Copy the Refresh token and paste it into ContactCenter > Settings > Dialogflow > Synchronization > Refresh token.
- You are almost done! Now you have to enter your chatbot Project ID or Agent Name, to get it follow the steps below. Note that the app does not need to be approved by Google.


Get Project ID
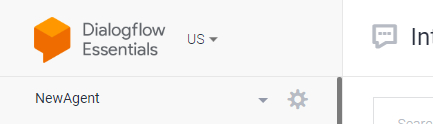
- Log in to the Dialogflow ES console by going to dialogflow.cloud.google.com. You must sign in with the same Google account used during the synchronization.
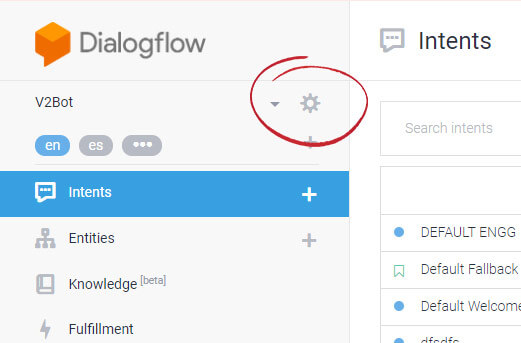
-
Click the
gear icon at the top left, near the chatbot name, and open the settings area.
.
If you haven't created a chatbot yet, follow the instructions below to create your first bot.
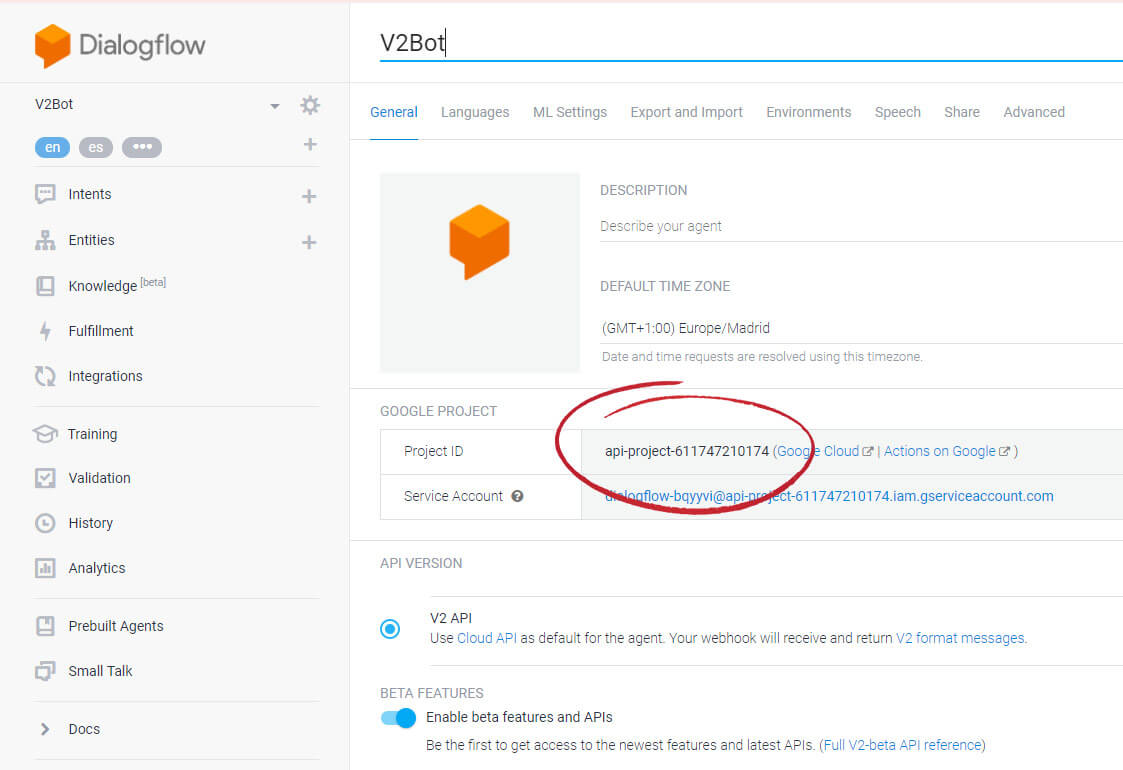
-
Copy the
Project ID
.
-
Make sure to choose
US / GLOBAL on the top left of the Dialogflow dashboard
.
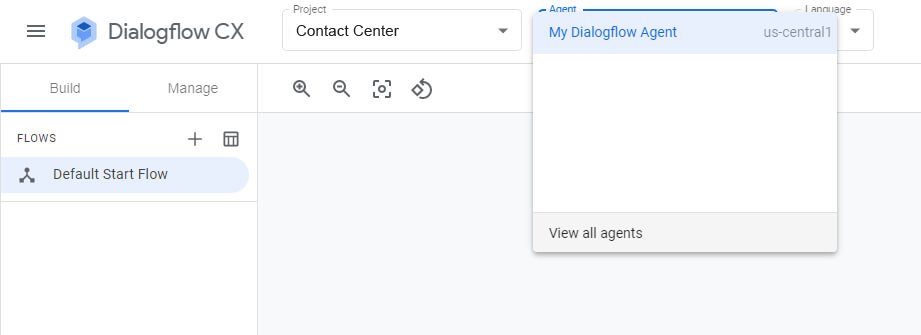
Get Dialogflow CX Agent Name
- Log in to the Dialogflow CX console by going to https://dialogflow.cloud.google.com/cx/.
-
Select the project of the desidered agent and go to the agents page.
You can enter the agents page by selecting the agent and by clicking the top button Agents > View all agents
.
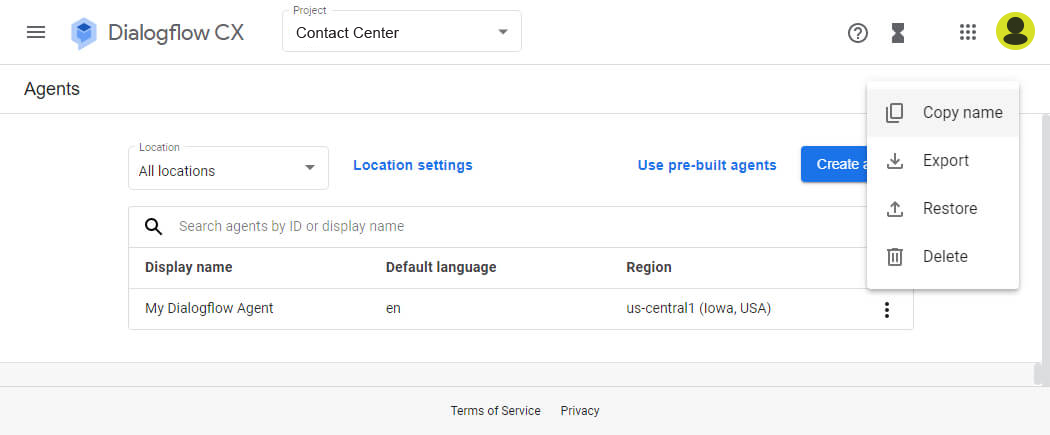
-
Click the options menu for the desiderate agent in click Copy name
.
- More details at https://cloud.google.com/dialogflow/cx/docs/quick/api#detect-intent-drest.
Chatbot Creation
If you haven't created a chatbot as of yet, follow the instructions below to create your first bot. The creation and management of your Dialogflow chatbot is handled entirely by Dialogflow. There are a lot of tutorials online that can help you create and configure your Dialogflow bot.
Create a basic chatbot
- To create your first chatbot enter the Dialogflow console and create an agent. As Google project select the same project used during the synchronization.
- Add a new Intent from the left menu and open it.
- In the Training phrases area adds the user's question you want the chatbot to reply to, add as many variants are you can. For example, if you want to the chatbot to reply to users asking for your business address, add variants like "what is your address", "address", "where are you".
- In the Responses area adds the bot answer as a text response.
- You have created your first question and answer! Test if from the right area or from the ContactCenter chat. Add new Intents to populate your chatbot with the questions and answers you want. You can include basic pre-built questions and answers by enabling the Small Talk feature from the left menu.
Here are some great resources to help you build a more complex chatbot:
Actions
The following actions give the chatbot the ability to interact with the website autonomously on behalf of the user. To use an action go to Dialogflow, edit an Intent, and add a new Custom Payload response with the following syntax: { "ACTION-NAME": ACTION-VALUE }.
| Action code | Description |
|---|---|
{ "human-takeover": true }
|
Disable the chatbot for 5 minutes, notify agents, and leave the conversation marked as unread. |
{ "disable-bot": true } |
Disable the chatbot for 5 minutes. |
{ "redirect": "URL" } |
Redirect the user to the given URL. Add the value "new-window": true to open the URL in a new window. |
{ "open-article": ID } |
Open the article with the given ID. |
{ "transcript": true } |
Generate the conversation transcript as a text file and download it.
Set it to email to send the transcript to the user's email, add the value message: "Your message" to include a message in the email. |
{ "department": ID } |
Change or set the conversation department and notify the agents. |
{ "agent": ID } |
Change or set the agent assigned to the conversation and notify the agent. |
{ "send-email": { "recipient": "active_user", |
Send an email to the active user or agents. Attachments syntax: [["name", "link"], ["name", "link"], ...]}. Recipient value can be active_user or agents. |
{ "update-user": true } |
Tells the admin area to update the user of the active conversation. Use this action in combination with other actions to update the user details of the admin area in real-time. |
{ "archive-chat": true } |
Archive the chat and send the close message if active. |
{ "update-user-details": { "email": "", "last_name": |
Update the details of the active user. You can update all details, including first_name, last_name, email, user_type, password You can update the user extra details, like the phone number, by entering the values into the extra key, the values must use the following syntax: "slug": [value, "label"]. Download an example here. To upload an Intent go to the Intents area and click the 3-dots menu icon on the top-right, then click Upload Intent. Start the conversation by sending the message "start". |
Automatic Translation
The automatic translation feature automatically translates user messages into agent language and agent messages into user language. To enable the language detection feature and automatic translation of agent messages to the language of the user, and user messages to the language of the agent, check the option Settings > Artificial Intelligence > Automatic translation and complete the synchronization process. The multilingual via translation feature also requires these steps.
- The Google account used for the Dialogflow synchronization must have billing and the cloud-translation service enabled, to do that follow the steps below:
- Log in to https://console.cloud.google.com with your Google account and select the project of your Dialogflow Agent.
- On the top search bar type cloud translation, select the Cloud Translation API service and enable it. Please note that this is a paid service with a free tier, additional charges may occur.
- Enable the billing by clicking Left menu > Billing and by enabling a billing account with a valid payment method. Enable billing for the project of your Dialogflow agent.
Once you completed the Google account setup the automatic translations start working immediately. Here more details:
- The user messages in the admin area are translated automatically in real-time to match the agent language.
- The agent messages are translated automatically in real-time to match the user language.
- Agents can view the original message by opening the message menu and by clicking View original message.
- The agent language is based on the language user detail of the agent if set, otherwise on the browser language, or admin area language.
- The user language is based on the language user detail of the user if set, otherwise on the browser language, or it can be detected with the feature Setting > Dialogflow > Language detection.
Information
- The user messages in the admin area are translated automatically in real-time to match the agent language.
- The agent messages are translated automatically in real-time to match the user language.
- Agents can view the original message by opening the message menu and by clicking View original message.
- The agent language is based on the language user detail of the agent if set, otherwise on the browser language, or admin area language.
- The user language is based on the language user detail, if set, otherwise on chat language, if set, otherwise on the browser language. The language can also be detected with the feature Setting > Artificial Intelligence > Language detection.
- The notifications are also translated.
- To avoid translating a string, enclose it with the characters ` or ```.
Multilingual via translation
The feature at Settings > Artificial Intelligence > Multilingual via translation automatically translates user messages into the default language of Dialogflow or OpenAI, and translates Dialogflow or OpenAI messages into the language spoken by the user. Additionally, this feature translates all text displayed within the chat, such as the chatbot's rich messages, registration forms, and pop-up notifications. To enhance performance and minimize translation costs, the translations are automatically integrated into the translation files. Combine this feature with the language detection feature for optimal results.
- The original texts must be in English.
Language detection
Detect the language of the user' messages and change the user language and Dialogflow agent language accordingly, if available, otherwise, show a fallback message. You can use the following merge fields in the message: {language_name}.
- Register at https://programmablesearchengine.google.com/.
- Create a search and setup it is as you want. We recommend to add only your website and Wikipedia if you want your chatbot to reply to general questions, leave disabled the option Search the entire web. Use the setting Entities to exclude invalid results.
- Go to Edit search engine > Setup > Basic and copy the Search engine ID value, paste it in Contact Center.
- To get the API key visit https://developers.google.com/custom-search/v1/overview and click Get a key.
Human Takeover
General information
- When the human takeover is activated the chatbot is automatically disabled for as long as the agent is online. After that, the chatbot is activated again but no default fallback messages will be sent within 10 days of human takeover if the chatbot doesn't know the answer to the user's question in the same conversation. You can force a Dialogflow message to be always sent by adding to the Intent the custom Payload value "force-message": true.
- The chatbot is fully activated again when the conversation is archived or deleted.
- If you're using Slack, no messages will be sent if the chatbot knows the answer. Once the human takeover is active all conversation's messages are sent to Slack.
- When a human agent reply to a user the human takeover is activated automatically.
Human takeover option
When the option Human takeover is active the following happens:
- If enabled, the request is sent only if the message sent by the user is longer than 3 chars and contains at least two words. This optimization prevents mistaken requests.
- The conversations to which the chatbot was able to answer correctly, are marked as read and moved at the bottom of the Inbox list.
When the user confirms the human takeover, or if it is automatic, the following happens:
- The conversation is marked as unread and moved on top of the Inbox.
- Any future user messages in the same conversation sent within 10 days of the human takeover, and without an answer from the bot, will trigger agent notifications.
- If agents email notifications are active, an email notification is sent to the agent assigned to the conversation, or, if the user's conversation is assigned to a department, to the agents assigned to that department, otherwise it is sent to all offline agents.
- If push notifications are active, a push notification is sent to the agent assigned to the conversation, or, if the user's conversation is assigned to a department, to the agents assigned to that department, otherwise it is sent to all offline agents.
- If text message notifications are active, a text message is sent to the agent assigned to the conversation, or, if the user's conversation is assigned to a department, to the agents assigned to that department, otherwise it is sent to all offline agents.
- No human takeover requests within 10 days of the human takeover will be sent in the same conversation.
- If Settings > Message > Follow up message is active, the message requesting the user's email is sent only if the user does not have the email.
- If Settings > Messages > Offline Message is active, the offline message is sent only if it is not office hours or if all agents are offline.
- If Settings > Miscellaneous > Queue is active, the queue is activated.
Manual human takeover
- You can manually trigger the human takeover by creating a new Intent with the following Custom Payload response: { "human-takeover": true }.
- The manual takeover automatically notify agents via email and leave the conversation marked as unread.
- To manually send a human take over request use the chips rich message with ID sb-human-takeover. Ex. [chips id="sb-human-takeover" options="Human support,Cancel" message=""].
- When a human agent reply to a user the human takeover is activated automatically.
Manual human takeover
The make the human takeover request work on WhatsApp, Messenger, Telegram you need to create a
new Intent with human-takeover as input Context, nothing as output Context, a
list of the user's most common confirmation messages as Training phrases(e.g. ok, yes)
and { "human-takeover": true } as Custom Payload response
.
Smart Reply
Smart Reply suggests quick responses in real-time during a conversation. Once active, you will see the suggested replies in the conversation area, if any. There are two ways to populate the suggestions: via bot, via agent Assist.
Bot Suggestions
To use the bot's suggestions just sync Dialogflow normally and train the chatbot as usual. The same chatbot used for the users will be used.
Agent Assist Suggestions
Agent Assist requires techincal knowledge in order to work and it's intended only for enterprise business with a data set of at least 30.000 conversations. If you never used Agent Assist you most likely don't have the knowledge and data to use it, and so you can ignore it. More details at https://cloud.google.com/agent-assist/docs/conversation-profile.
Information
- Smart reply first look for a suggestion from the bot, if there is at least one it returns the results, otherwise look for the suggestion via the agent assistant if available. The agent assistant is never used if the chatbot gives at least one hint.
OpenAI
OpenAI (ChatGPT) integration gives your chatbot the ability to answer general questions about almost anything you can imagine. To start using it, follow the steps below.
- Register at https://beta.openai.com/signup.
- Get an API key from https://beta.openai.com/account/api-keys and paste it into Settings > Dialogflow > OpenAI > API key
Generate user expressions - Option
When this option is active, OpenAI will generate new user expressions in real time when you open the Dialogflow Intent window by clicking the Send to dialogflow menu item of a message in a conversation.
Generate user expressions - Button
When you click the button Generate user expressions, openAI will update your Dialogflow agent and generate new user expressions for each Intent.
- Make a backup of your Dialogflow agent first.
- This task can take several minutes or even hours if your chatbot has a lot of Intents. Since the operation takes a long time, your server may interrupt the operation (operation timeout) before it finishes, in which case you need to click the button again. You can verify if the operation is interrupted by checking the browser console for errors.
- This task is performed only once per Intent. Previously processed Intents will be ignored.
- This task checks existing user expressions and does not create duplicates.
- The first 5 user expressions will be used to generate new user expressions.
- Since this is an automated process, we strongly recommend reviewing your Intents after the task has been completed.
Information
- The OpenAI query is performed only if the chatbot does not know the answer to the user's question and if the length of the user's message is greater than 6 characters.
Google search
The Google search features give your chatbot the ability to search for answers on Google and your website and automatically correct misspelled user questions. To start using it, follow the steps below.
- Register at https://programmablesearchengine.google.com/.
- Create a search and setup it is as you want. We recommend to add only your website and Wikipedia if you want your chatbot to reply to general questions, leave disabled the option Search the entire web. Use the setting Entities to exclude invalid results.
- Go to Edit search engine > Setup > Basic and copy the Search engine ID value, paste it in ContactCenter .
- To get the API key visit https://developers.google.com/custom-search/v1/overview and click Get a key.
Entities
The Entities setting analyze the user's message and recognize and extract entities like cities, events, dates, and more. Use it to exclude invalid results returned by Google search. To enable this setting follow the steps below.
- Log in to https://console.cloud.google.com with your Google account and select the project of your Dialogflow Agent.
-
Enter Cloud Natural Language API in the search bar at the top, select Cloud Natural Language API and enable the API
.
- Enable the billing by clicking Left menu > Billing and by enabling a billing account with a valid payment method. Enable billing for the project of your Dialogflow agent.
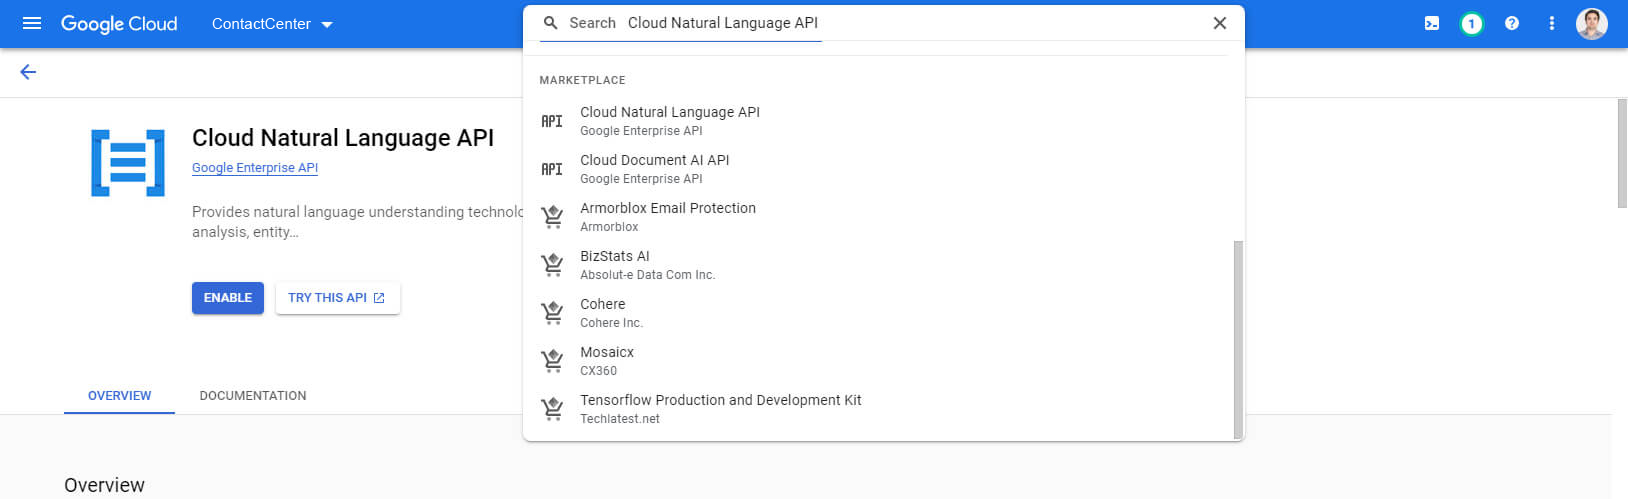 .
.
Information
- The Google search is performed only if the chatbot does not know the answer to the user's question and if the length of the user's message is greater than 6 characters.
- If the Google search returns a result, the Dialogflow context google-search is automatically activated. The context contains the attribute link which is the website's link of the Google search result. Use the context to create a new intent that provides the link, if the user sends a message like tell me more or I want to know more.
- Google Search is not required to activate the spelling correction. You can disable Google Search and activate only spelling correction.
- If Google Search is active, it will have priority over OpenAI.
Fulfillment
The fulfillment data sent to your webhook URL is like below:
{
		"responseId": "4a58fc4f...",
		"queryResult": {
			"queryText": "fullfilment",
			"parameters": [],
			"allRequiredParamsPresent": true,
			"fulfillmentText": "Example",
			"fulfillmentMessages": [{
				"text": {
					"text": ["Response"]
				}
			}],
			"outputContexts": [{
				"name": "projects/test...",
				"parameters": {
					"no-input": 0,
					"no-match": 0
				}
			}],
			"intent": {
				"name": "projects/test...",
				"displayName": "Fullfilment"
			},
			"intentDetectionConfidence": 1,
			"languageCode": "en"
		},
		"originalDetectIntentRequest": {
			"payload": {
				"support_board": {
					"conversation_id": "3002",
					"user_id": "3777"
				}
			}
		},
		"session": "projects/example/agent/sessions/3777-3002"
	}
The payload and session fields contain the ContactCenter user ID and conversation ID.
Information
Knowledge Base
Knowledge Base are automatically enabled. Knowledge Base is a feature that gives your chatbot the ability to search within documents (such as a PDF) or web pages to find an answer. To create your first Knowledge Base, go to cloud.google.com/dialogflow/docs/knowledge-connectors
Dialogflow response
The full Dialogflow JSON response is automatically saved in the database, sb_messages, column payload.
User attachments
User attachments are sent to Dialogflow by appending the attachments to the message details in the following format:
[name:file-name.ext,url:URL,extension:file-extension]
Example:
[name:archive.zip,url:https://www.contactcenter.gr/archive.zip,extension:zip]
	[name:license.pdf,url:https://www.contactcenter.gr/license.pdf,extension:pdf]
Bot attachments
To allow the chatbot to send attachments, add a Custom Payload response and insert this JSON code:
{ "attachments": [["name", "YOUR-LINK"], ["name", "YOUR-LINK"], ["name", "YOUR-LINK"]]}
Replace "name" with the actual name of the attachment to display and replace "YOUR-LINK" with the actual URL of the file. Images attachments are displayed automatically as images.
Rich messages
To allow Dialogflow to send rich messages, simply enter the rich message shortcode into the TEXT RESPONSE field or add a new Custom Payload response and insert this JSON code: { "rich-message": "shortcode" }. Replace "shortcode" with the rich message shortcode, to have a valid JSON code you need to replace all " chars with \". To obtain the shortcodes or to learn how to create a rich message, please click here.
Rich message response
When the user interacts with rich messages via the ContactCenter chat (e.g. by clicking a button), the rich message response is sent to Dialogflow in the following format: ID|response, or ID if the rich message type is registration, email, follow up, in this case the rich message values are sent as array in the queryParams['payload'] key. ID is the rich message ID, which can be set by adding the attribute id="YOUR-ID" to the shortcode. If no ID has been set, a random ID will be used instead. response is the input or selection of the user. To block Dialogflow from replying to a rich message add a new intent with ID as the only user expression and no response.
If the user is interacting with the chatbot via a messaging app (e.g. WhatsApp), the response of the rich message does not contain the rich message ID and Dialogflow contexts must be used to allow Dialogflow to understand which Intent to activate for a specific rich message response.
Get rich message response for registration, email, follow up
- From Left menu > Fulfillment enable Webhooks, you only need to enter the URL of the file that will receive the Dialogflow webhook data.
- Create an Intent with the ID of the rich message, for the registration form, enter registration, for the follow up form enter sb-follow-up-form, for email forms enter email.
- Enable the Fulfillment for the Intent
- You're done! The file of the webhook URL will receive the ContactCenter rich message user details.
Dialogflow chatbot optimization
- If the chatbot is replying with the wrong intents, go to Dialogflow Console > chatbot Settings > ML Settings, and set the ML CLASSIFICATION THRESHOLD to a larger number, such as 0.6.
Sequential survey
To create a sequential survey like the one of the demo you need to Enter the Rich message ID in the Training phrases, check the example below.
- Go to Dialogflow and create a new intent. In the Training phrases area enter the user expression survey example. In the Responses area enter the code [buttons id="test-survey-1" options="Software,Physical products,Services" title="What is your type of business?" message="Please choose the type that best suits your company." success="Your company type is "]
- Create a new intent. Enter the user expression test-survey-1 and as response enter [select id="seq-survey-2" options="Priority post, Express courier, International courier" title="Shipping methods" message="Choose the preferred shipping method of your customers" success="Your customers preferred shipping method is"]
- Create a new intent. Enter the user expression test-survey-2 and as response enter Thank you for completing our survey!.
- You're done.
Bot training
Agents can add new Intents and chatbot responses, and add new training phrases to existing intents on the fly from the admin area by moving the mouse cursor over a message and clicking the Dialogflow Intent icon. New Intents will contain also the responses, while the update of existing intents will add new training phrases only, but not new chatbot responses. If you're using Dialogflow CX, the chatbot responses will be added to the latest flow used in the conversation if any, otherwise to the start flow.
Departments linking
- Get the department IDs from Settings > Miscellaneous > departments.
- Get the project IDs from the Dialogflow settings area of your agents.
More information
- You can activate the chatbot via API but sending a message with no text and payload { "event": "activate-bot" }.
- Supported chinese language is only Chinese - Simplified. Please use the Dialogflow language Chinese - Simplified (zh-CN) only. The languages codes zh-HK and zh-TW will not work.
- The following details are sent to Dialogflow in the queryParams parameter when detecting an intent: conversation_id, user_id.
- To trigger the welcome event in Dialogflow CX, create a Event Handler and insert Welcome as Custom Event.
- ContactCenter articles are synchronized automatically with the Dialogflow knowledge base.
- Use the JS variable SB_DIALOGFLOW_AGENT = "AGENT ID" to change the default Dialogflow agent, replace "AGENT ID" with the project ID.
The settings below are related to the WhatsApp app.
Installation
WhatsApp Cloud API Setup
- Create a Developer account and a new Facebook app as described at https://developers.facebook.com/docs/whatsapp/cloud-api/get-started#set-up-developer-assets.
-
In ContactCenter > Settings > WhatsApp > Cloud API > Secret key enter a random string then go to https://developers.facebook.com/apps and select your app. Click Add product and add WhatsApp, then go to WhatsApp > Configuration and in Webhook URL enter the URL you get from ContactCenter > Settings > WhatsApp > Cloud API > Configuration URL.
In Verify token enter the secret key you previously entered in ContactCenter. Click Verify and save, click Webhook fields > Manage, enable the following Webhook fields: messages.
-
In ContactCenter > Settings > WhatsApp > Cloud API > Token enter the test token for testing, and follow the instructions below for getting the permanent access token.
- Visit https://business.facebook.com and go to Left menu > Settings > More system settings, then go to Users > System Users to view the system user you created, or create a new one. Click on that user and select Add Assets. The system user needs to be an admin.
- Click Left menu > Apps and under Select Assets and choose your app. Enable Develop App for that app and save.
-
Click Generate Token and select your app, enable the following permissions: whatsapp_business_management, whatsapp_business_messaging, business_management. Click Generate Token and save. Paste the token in ContactCenter > Settings > WhatsApp > Cloud API > Token.
- To get the Phone ID enter https://developers.facebook.com, select your app and go to Left menu > WhatsApp > Getting started.
-
You can test the integration from https://developers.facebook.com,
select your app and go to Left menu > WhatsApp > Getting started.
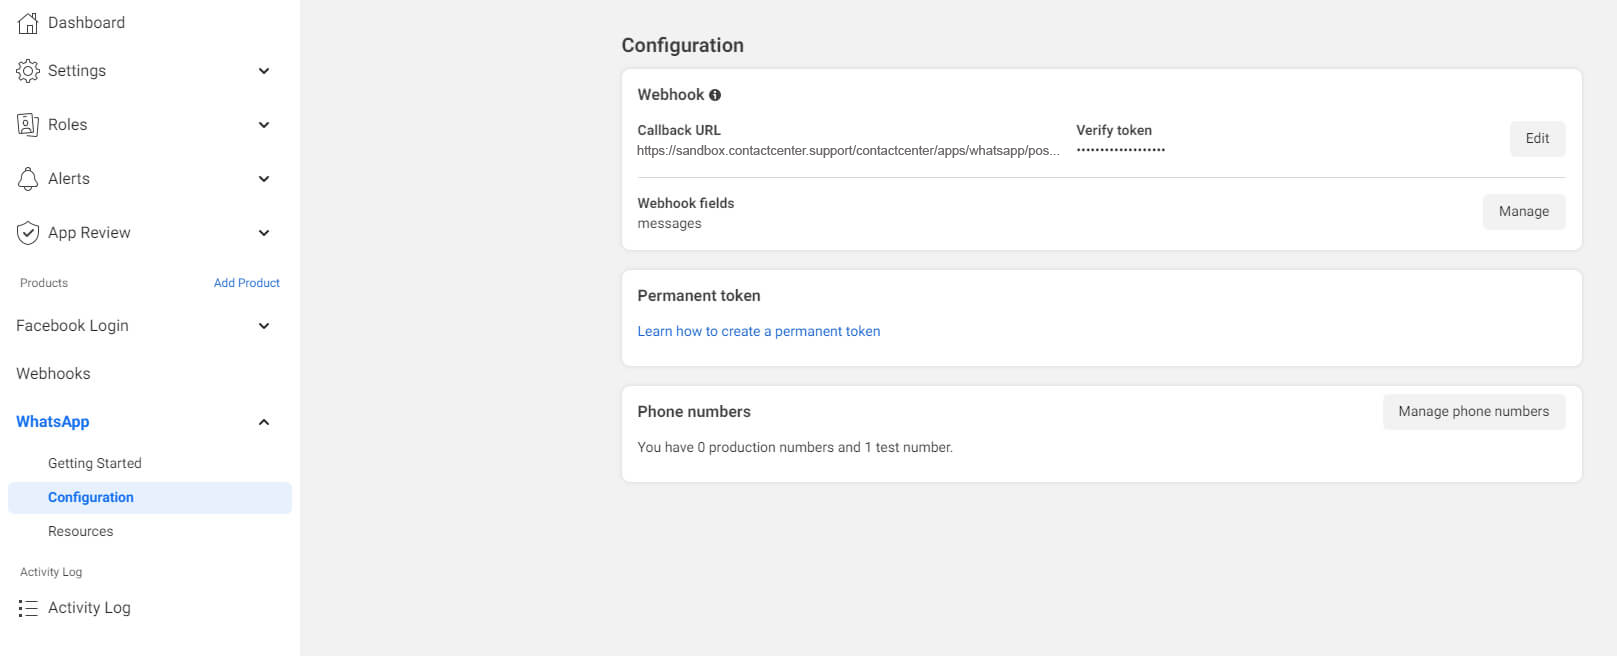


360dialog Account Setup
- Go to https://www.360dialog.com/ and create a new account.
- Enter your dashboard and from Left menu > WhatsApp Accounts generate the API key and copy and paste it in ContactCenter > Settings > WhatsApp > 360dialog settings.
- Click ContactCenter > Settings > WhatsApp > 360dialog settings > Synchronize now.
- Done! ContactCenter should start receiving the WhatsApp messages sent to your number, and you can reply to those messages from ContactCenter .
- Note that you can also use the free sandbox account for testing, more details at https://docs.360dialog.com/whatsapp-api/whatsapp-api/sandbox. The sandbox account has limitations and some features, such as media attachments, will not work.
Twilio Account Setup
- Go to https://www.twilio.com and create a new account.
-
Verify your phone number.
-
Complete the form and choose WhatsApp, Alerts & Notifications, With no code at all, 3rd party integrations.
-
From the Twilio console
copy ACCOUNT SID and AUTH TOKEN and paste them into ContactCenter > Settings > WhatsApp > Twilio settings, save the changes.
-
You will now set up a free test account to run some tests and make sure the integration works with ContactCenter .
From the left menu click Messaging > Settings > WhatsApp sandbox settings
and enter into WHEN A MESSAGE COMES IN and STATUS CALLBACK URL the URL of ContactCenter ,
get it from ContactCenter > Settings > WhatsApp > Twilio settings > Get configuration URL.
Mind that localhost will not work, you need a public URL and a live server.
-
From the left menu click Messaging > Try it out > Send a WhatsApp message.
Follow the instructions and send the message with the code to the WhatApp number provided. Click the next buttons until the configuration is complete.
- Done! ContactCenter should start receiving the WhatsApp messages sent to the sandbox account, and you can reply to those messages from the ContactCenter .
- To publicly use the WhatsApp integration with your customers you need to update your account and enable billing, you can do that here. After that you will need to purchase a Twilio number, which will be the phone number of your official WhatsApp Business account. More details here. You cannot use the phone number of your existing WhatsApp Business account, you must use a Twilio number. More details here.
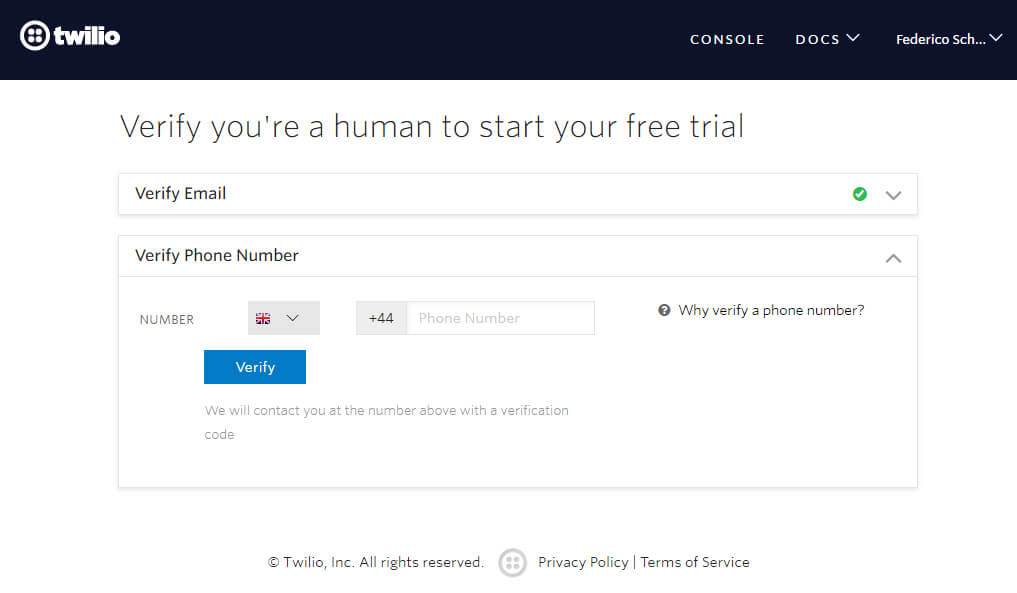
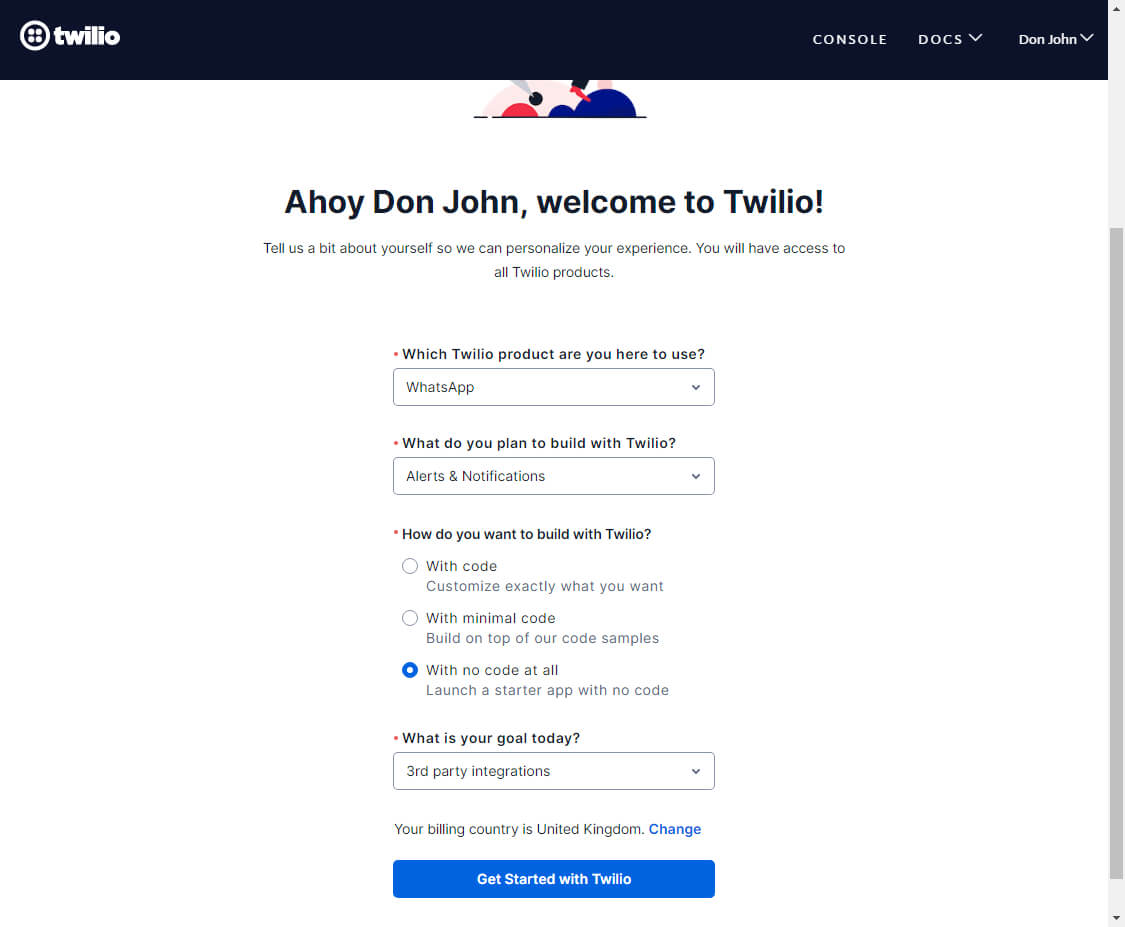
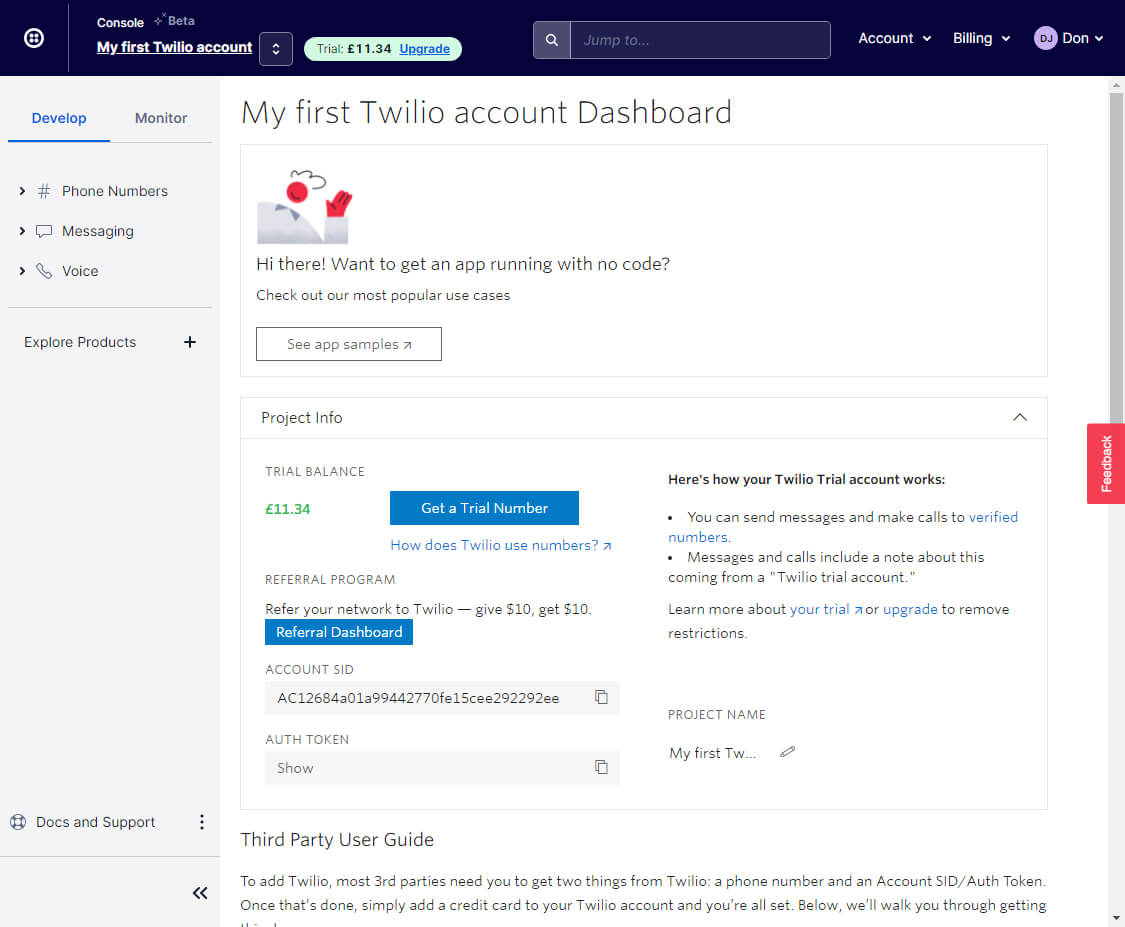
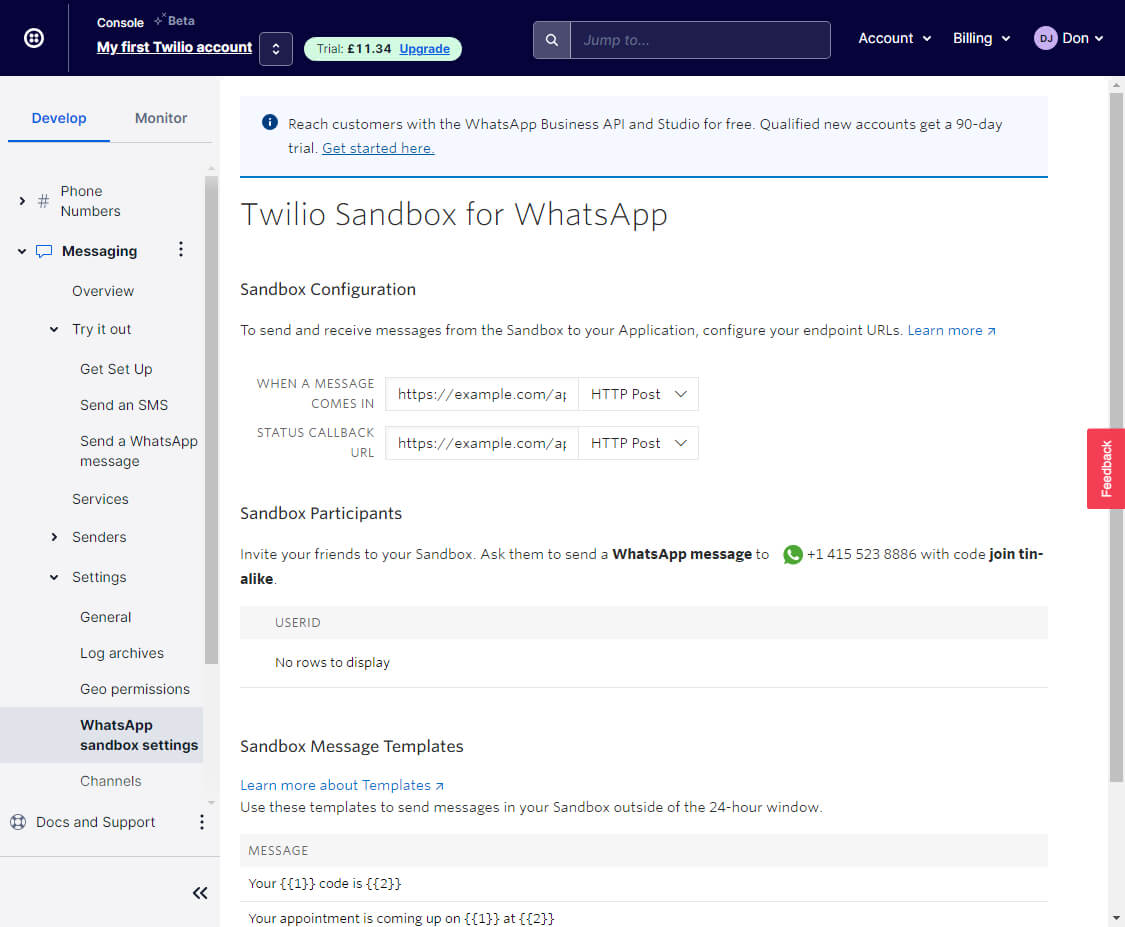
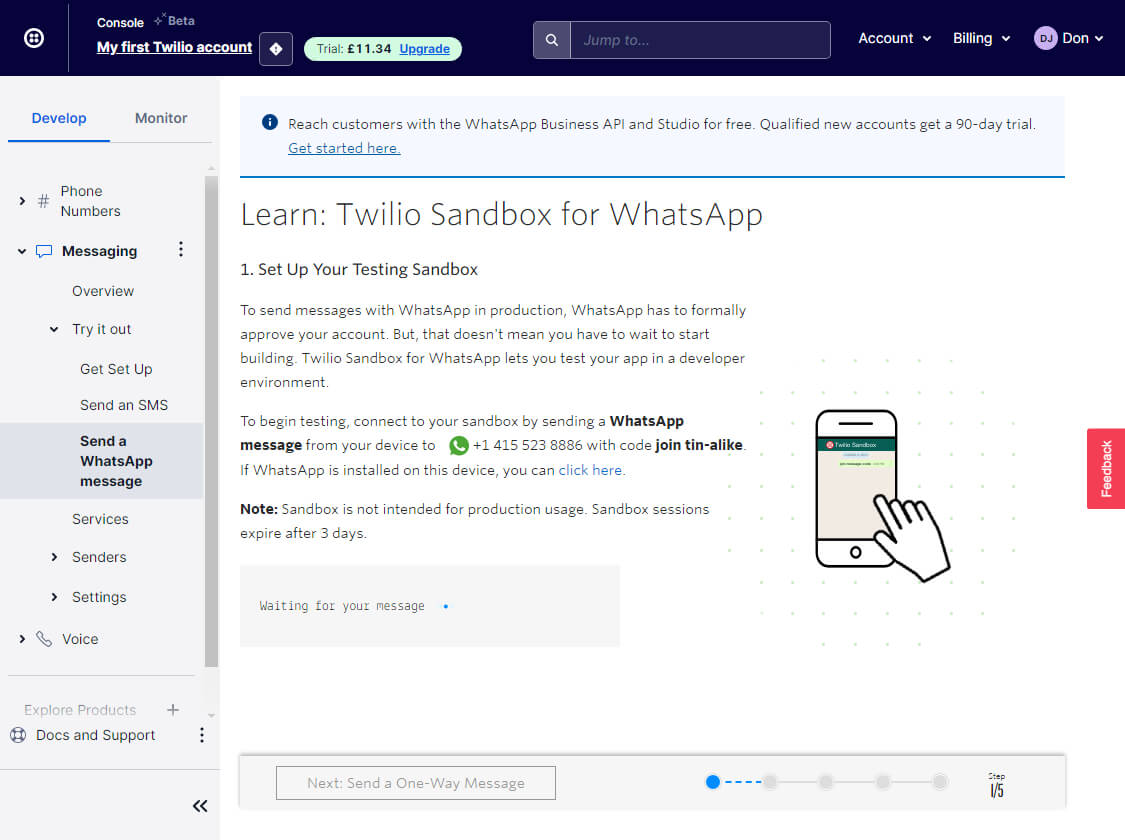
Fallback messages
As for WhatsApp Business Policy, you cannot send outbound marketing and solicitation messages to end users. End user users must reach out to you first. You have 24 hours from when the end user's message was sent from WhatsApp to reply to the message. If you want to send a message after 24 hours from the last user's message you need to use the text message fallback or WhatsApp template message.
Text message fallback
To enable the text message fallback you must set up the SMS in Settings > Notifications > Text message notifications.
More details here
WhatsApp Template Messages
A WhatsApp Template Message is a message format that you can use over and over again to message users once they have opted-in and given your app permission to send them messages. You can not Enter the original message into the template, you must use it to notify the user of a new message and instruct him on how to view it, for example by providing a link to your website where the chat is shown.
WhatsApp Cloud API
- To get the Template name and manage the templates visit https://business.facebook.com and go to Left menu > Settings > More system settings, then go to Accounts > WhatsApp accounts > Settings and click WhatsApp Manager.
- In Template languages enter all the language codes supported by your template, separated by commas. If a language is not found the fist language code is used instead. Language codes list here (copy only the language code, e.g. it, es, en_US).
- In Header parameters and Body parameters enter the supported merge fields separated by commas, e.g. {recipient_name}, {conversation_url_parameter}. The number of parameters entered here must match the number of parameters of the template. Use this feature if your template uses dynamic values. Order is important, the first merge field will be used as the first template parameter.
Twilio
Enter the template code into ContactCenter > Settings > WhatsApp > Template fallback
If you're using the Twilio sandbox for testing you can use pre-approved templates like Your {{1}} code is {{2}},
you can replace the variables with the ContactCenter ones like {recipient_name}, for example, Your {recipient_name} code is {recipient_email}.
More details here.
360dialog
- Get the Namespace value from Left menu > WhatsApp accounts > Details.
- Get Template name and Template default language from your 360dialog templates area.
- In Custom parameters Enter the supported merge fields separated by commas, example: {recipient_name}, {conversation_url_parameter}. Use this feature if your template uses dynamic values. Order is important, the first merge field will be used as the first template dynamic value.
- ContactCenter will try to use the template with the same language as the user, if it is not available, it will use the template with the default language. The following template languages are not compatible: en_GB(use en_US), pt_PT(use pt_BR), zh_HK and zh_TW(use zh_CN), es_AR and es_MX(use es_ES).
WhatsApp shop
To displays the products of your shop use the merge fields below.
| Merge field | Description |
|---|---|
| {catalog id="123" product_id="123" body="" footer=""} | Display a single product. Replace id with the catalog ID and product_id with a product ID. The attributes body and footer are optional. |
| {catalog id="123" product_id_1_1="123" product_id_1_2="123" product_id_2_1="123" section_1="" section_2="" header="" body="" footer=""} | Display multiple products. Replace id with the catalog ID. Add products by grouping them into sections, via the attributes product_id_[A]_[B], replace [A] with the section index, starting from 1, replace [B] with the product index, starting from 1 for each section. You must also add the attribute section_[A]="" for each section, replace [A] with the section index. The attributes header and body are required, footer is optional. |
- When the user sends the order, the order information is sent to the URL specified in Settings > WhatsApp > Order webhook. The page at that URL should process the order and send a message to the user via the PHP API function sb_whatsapp_send_message().
More information
- If you does not receive WhatsApp messages make sure you are not assigning the WhatsApp conversations to a department and that the WhatsApp number used for testing is not a phone number of a ContactCenter admin or agent. Also, make sure you setup correctly the WhatsApp webhook URL.
- If you can not send messages, an error should appear in the admin area when you try to send a message to the user.
- We cannot provide support for Twilio or 360dialog configuration, including all related issues.
- We cannot provide support in getting your WhatsApp account or WhatsApp message template approved.
- WhatsApp conversations and messages are compatible with routing and queue.
- If you are testing with the sandbox and after 72 hours you can no longer send messages to your phone number you must link again your phone number to your sandbox.
- If you send chips, buttons or select rich messages, with more than 3 options, you can use the whatsapp="Your menu text" shortcode attribute to set the text of the WhatsApp message menu.
MESSENGER
The settings below are related to the Messenger app.
Installation
- Go to Settings > Messenger and click Start synchronization.
- Complete the synchronization by choosing at least 1 Facebook page and enter the returned information in Settings > Messenger > Facebook pages.
- You're done. All messages sent to the Facebook pages and Instagram accounts you selected will appear in the conversation admin area of ContactCenter .
To link Instagram to your Facebook page and ContactCenter follow the steps below.
- Enter the Settings area of your Facebook Page and click Left Menu > Instagram (https://www.facebook.com/YOUR-PAGE-SLUG/settings/).
- Click Connect account and complete the setup.
- Sync Messenger with ContactCenter again and you're done.
More information
To link Instagram to your Facebook page and ContactCenter follow the steps below.
- If you don't receive Instagram messages make sure to enable Settings > Privacy > Messages > Connected tools - Allow access/docs/whatsapp/ from your Instagram mobile app. Also, make sure your Instagram account is not setup as a professional account, it must be a business account.
- Every ContactCenter user has only 1 Facebook and Instagram conversation.
- ContactCenter rich messages are automatically converted to Facebook rich messages when possible, some part of the rich message could be removed or changed.
- Only private Facebook messages will get sent to your team inbox. If someone posts a Facebook message on your wall it won't appear in your team inbox.
- When someone sends a message to your company Facebook page or Instagram account they will get designated as a lead in ContactCenter . You'll only be able to see the user's Facebook or Instagram name and profile picture.
- Messenger conversations and messages are compatible with routing and queue.
- Dialogflow is supported for Facebook and Instagram, including the following features: Human takeover, ContactCenter rich messages, language detection and chatbot language switcher.
- Follow-up message is supported, but the delay setting is ignored, the message is sent instantly.
- Offline message is supported, but the timetable is not sent.
- Only 1 Facebook account can be synchronized, to link pages from multiple Facebook accounts, the account synchronized in ContactCenter must be an admin of all Facebook pages of the other Facebook accounts.
The settings below are related to the Twitter app.
Installation
- Register at https://developer.twitter.com. Make sure to verify your phone at https://twitter.com/settings/phone or the registration will fail.
- Create your first app by entering the app name and clickGet keys, copy API Key (Consumer key) and API Key Secret (Consumer secret) and paste them in ContactCenter > Settings > Twitter.
-
Request the Elevated access from https://developer.twitter.com/en/portal/products/elevated. Click Apply for Elevated and complete the form as follow:
In the first area In your words and in Will your app use Tweet, Retweet, Like, Follow, or Direct Message functionality? enter I need access to the Account Activity API to start receiving Twitter Direct Messages to my chat software(ContactCenter ) and to reply to them directly from ContactCenter.
Disable all the other fields by clicking No: Are you planning to analyze Twitter data?, Do you plan to display Tweets or aggregate data about Twitter content outside Twitter?, Will your product, service, or analysis make Twitter content or derived information available to a government entity?
- Wait a few days for Twitter to review and approve the Elevated access, you will receive an email from Twitter.
- Once you have Elevated access, enter the developers dashboard (https://developer.twitter.com/en/portal/dashboard) and from the left menu click Products > Premium > Dev environments and under Account Activity API / Sandbox click Set up dev environment, in Dev environment label enter sb or the same value entered in Settings > Twitter > Synchronization > Dev environment label.
-
Enter your app Settings area from Left menu > Projects & Apps > Your project > Your app and under User authentication settings click Set up and activate OAuth 1.0a.
In App permissions check Read and write and Direct message, in Callback URI / Redirect URL enter the URL you get from ContactCenter > Settings > Twitter > Get callback URL, in Website URL enter your website URL.
- Enter your app Keys and tokens area from Left menu > Projects & Apps > Your project > Your app > Keys and tokens and under Authentication Tokens generate Access Token and Secret, copy and paste them in ContactCenter > Settings > Twitter.
-
Enter your Twitter profile username in ContactCenter > Settings > Twitter > Your username.
Get it from your Twitter profile page, copy the name starting with @ or the URL part containing your username. Ex. https://twitter.com/ContactCenter1.
- Save the ContactCenter settings and click the button ContactCenter > Settings > Twitter > Subscribe and you're done. All messages sent to your Twitter account will be received by ContactCenter .
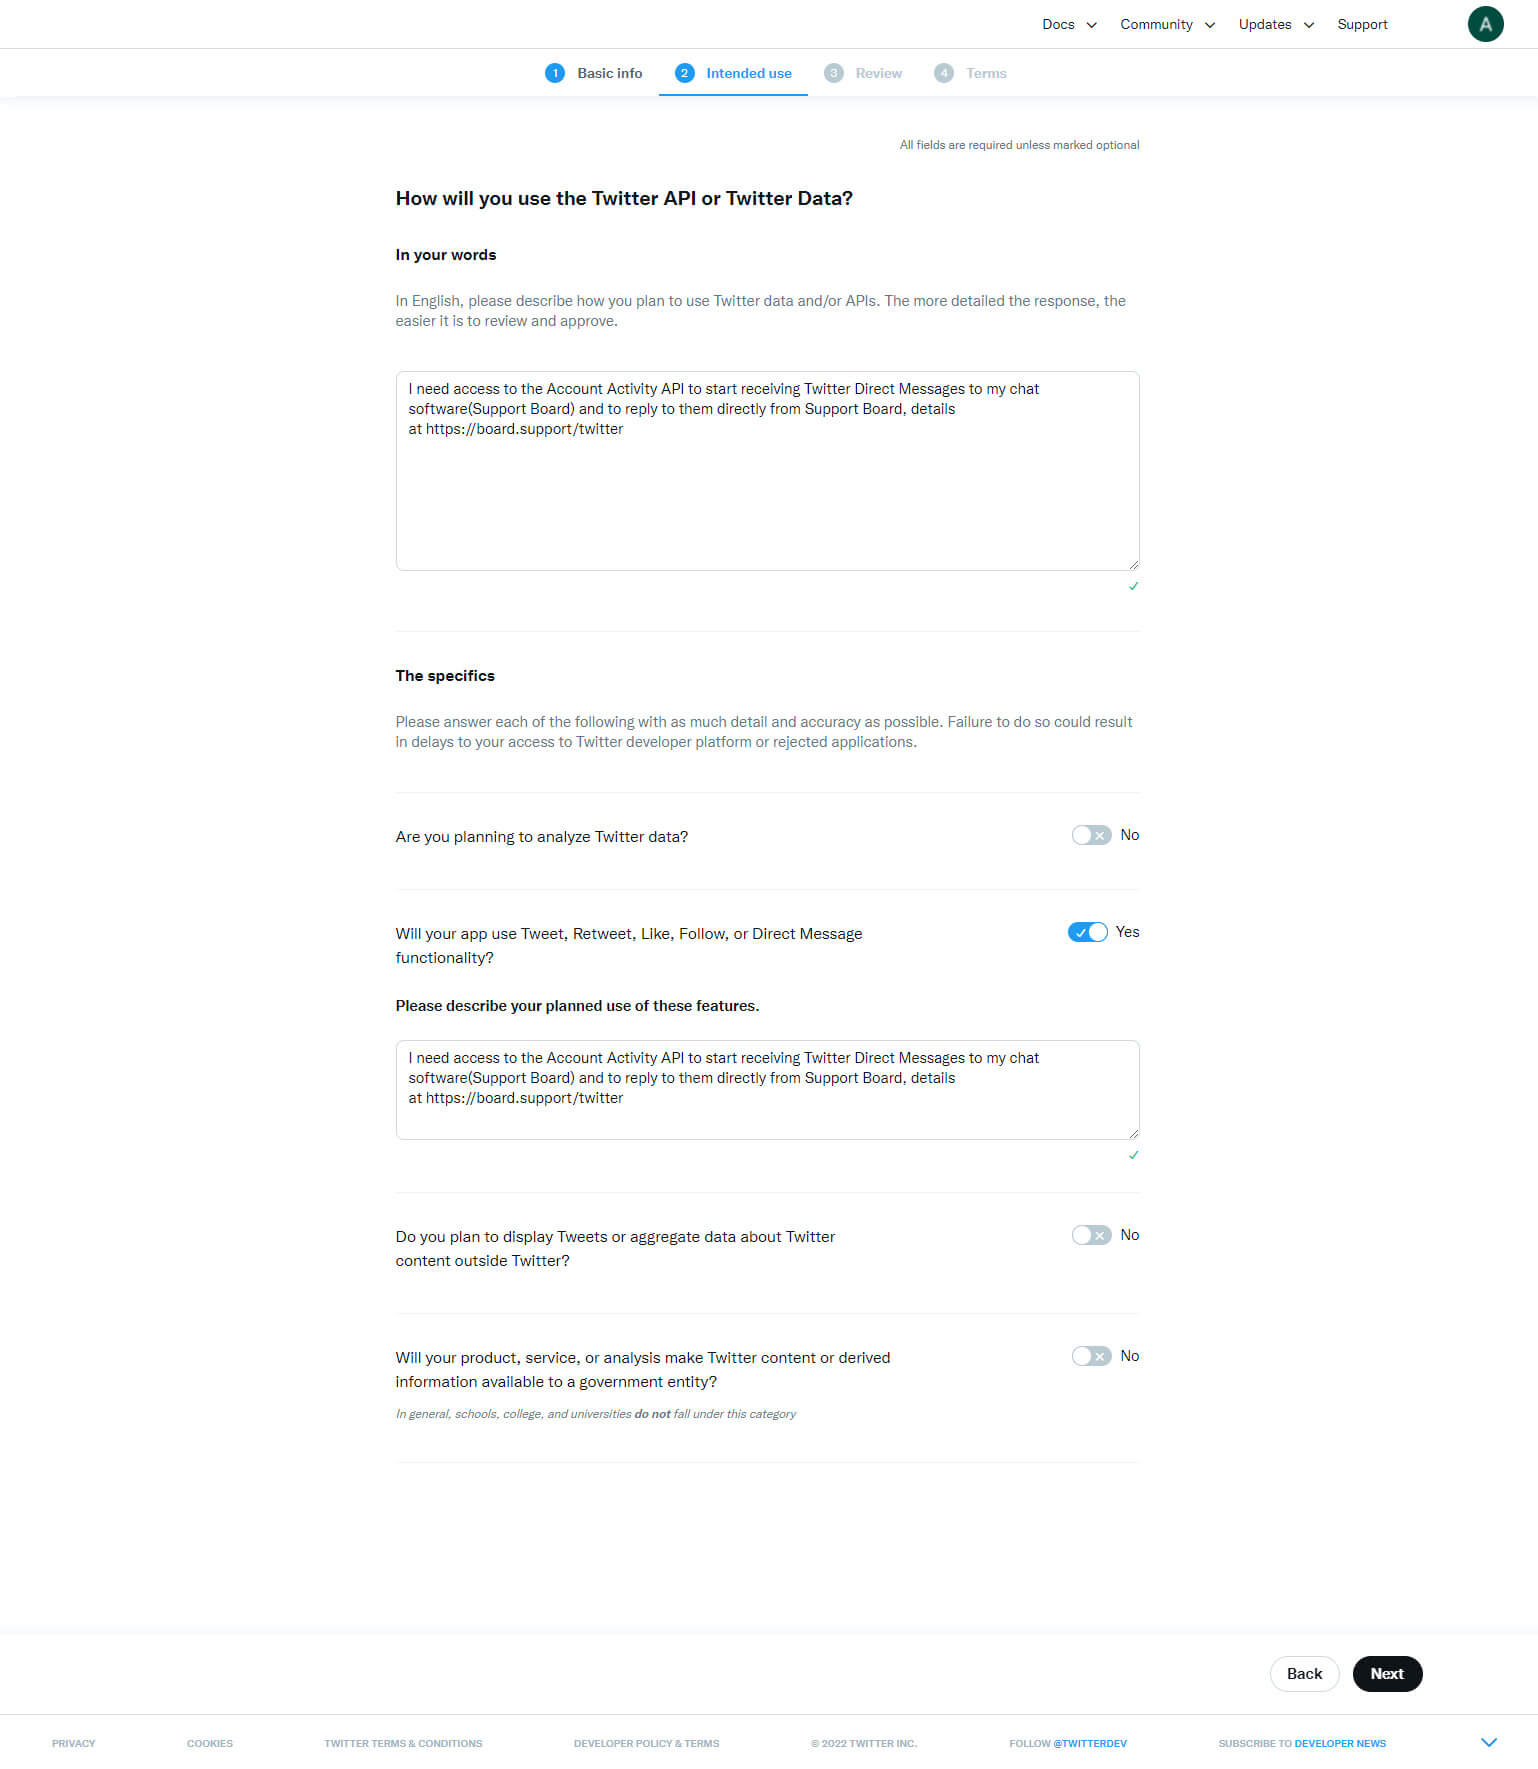
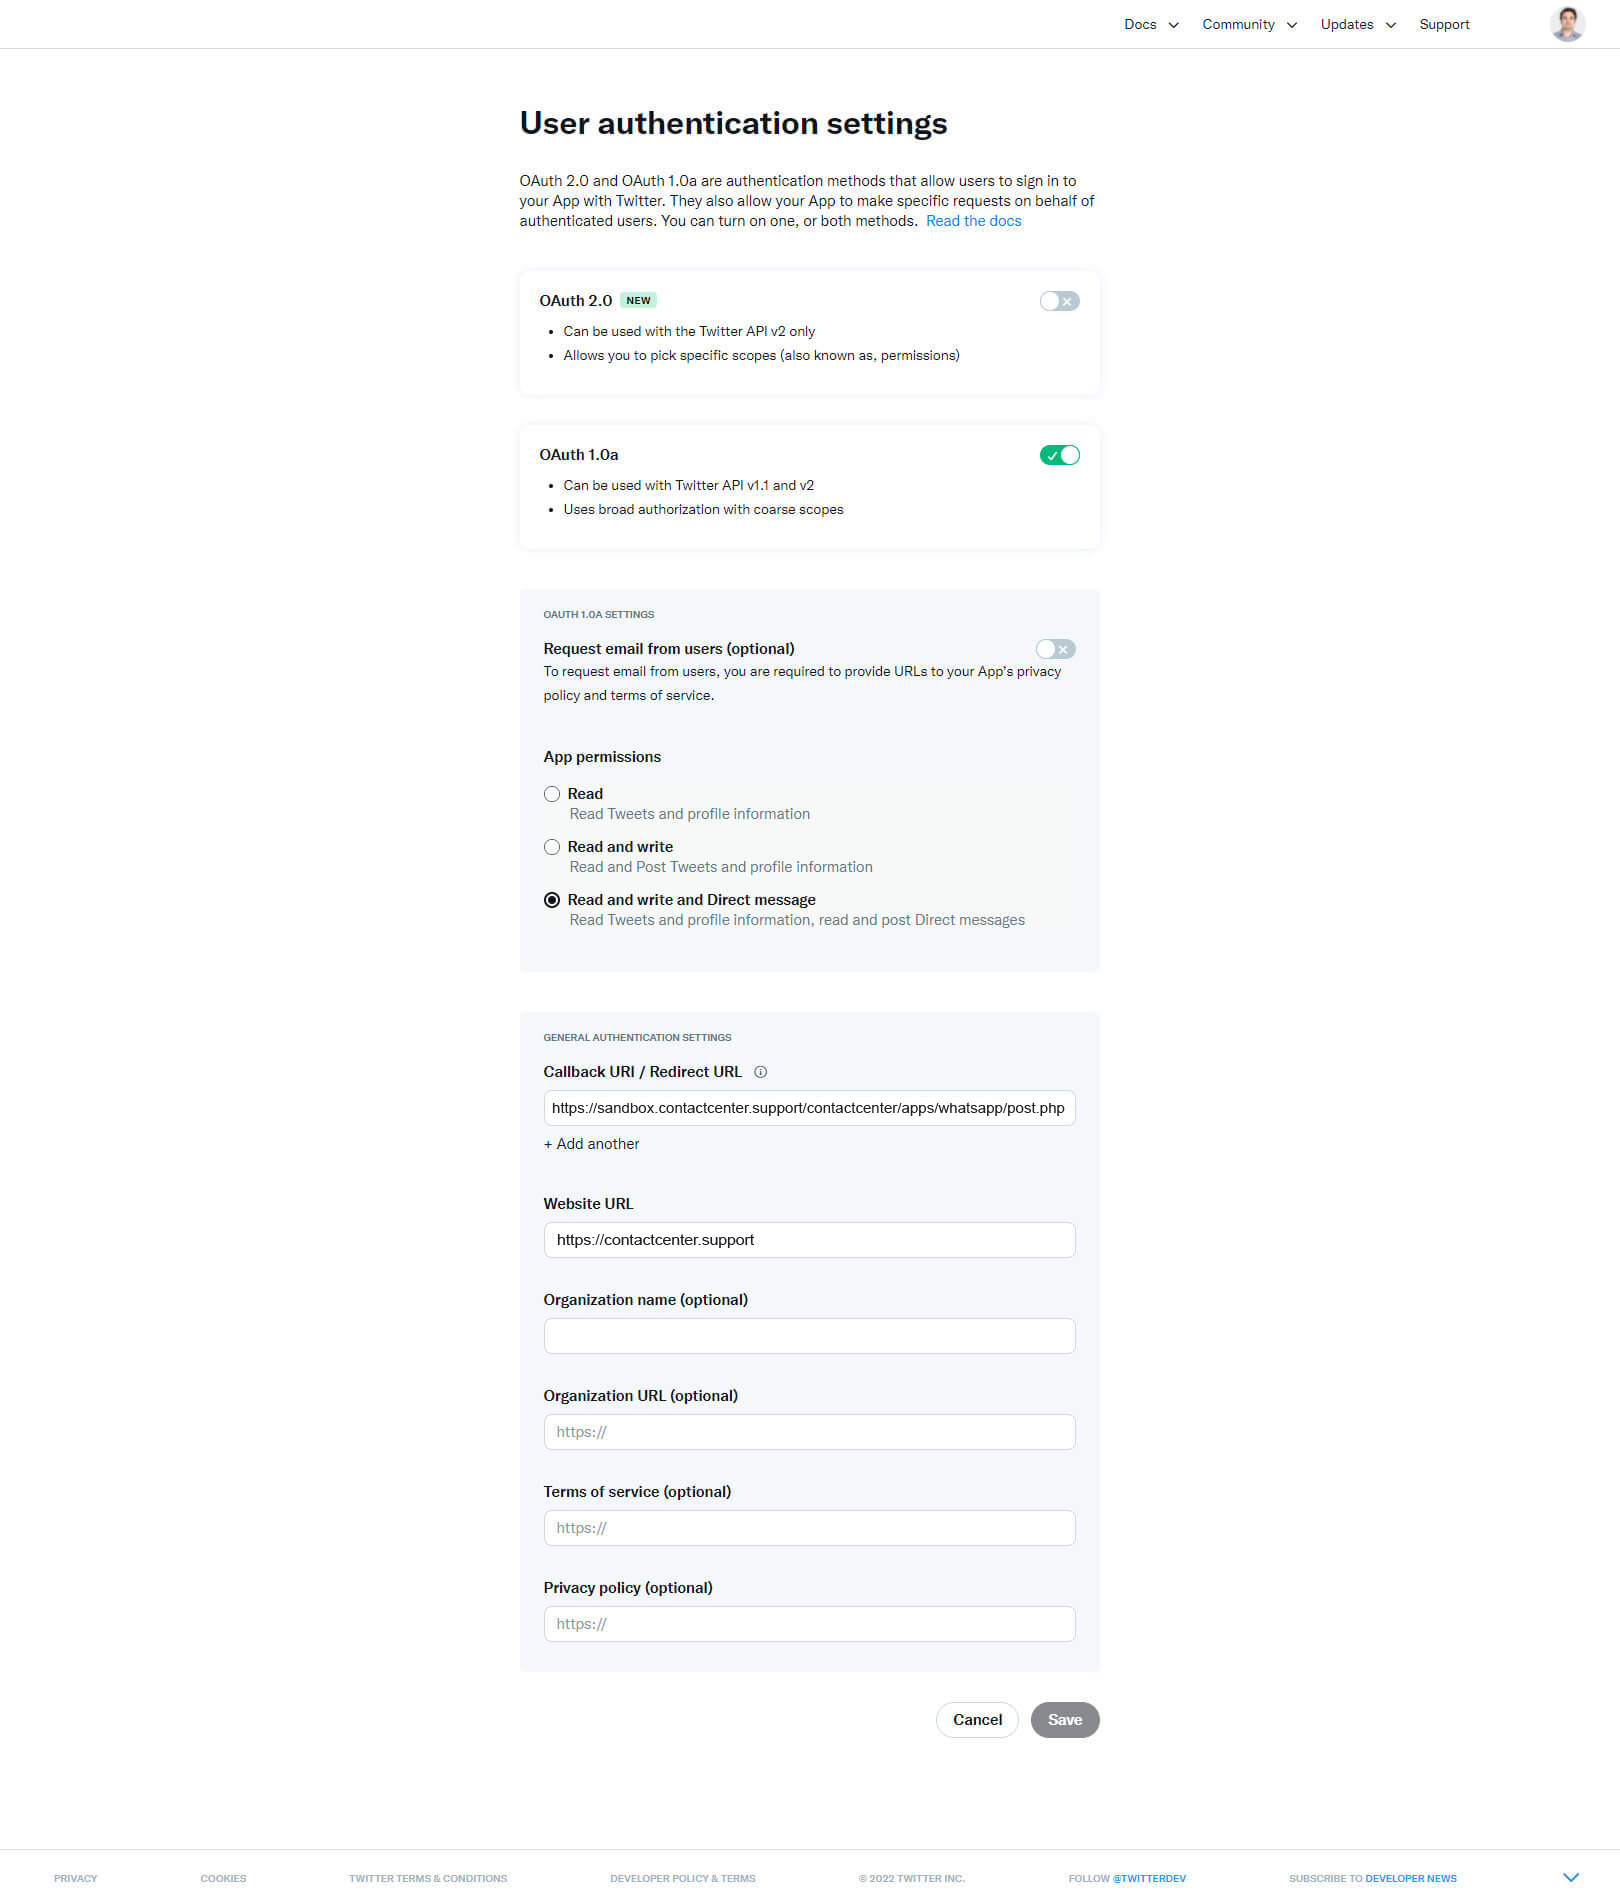
More information
- If you receive duplicate messages, the Twitter account you are using for testing may be the same as the one you synced. Try sending a message from another Twitter account.
- When a message is received from a Twitter user you may send up to 5 messages in response within a 24 hour window. No messages can be sent after 24 hours of receiving the Twitter message.
- You can send maximum 3 or 4 attachments depending by the media type.
- The following ContactCenter rich messages are not supported: images slider, slider, card.
GOOGLE BUSINESS MESSAGES
The settings below are related to the Google Business Messages app.
Installation
- In ContactCenter > Settings > Business Messages > Synchronization > Client token enter a random string and save.
- Open the Business Communications Developer Console (https://business-communications.cloud.google.com) and sign in with your Business Messages Google account.
- Click Partner account settings on top.
- Configure the Webhook by entering the Webhook URL and the Client token and save the changes, get the values from ContactCenter > Settings > Business Messages > Synchronization.
- Enter back into the Business Communications Developer Console (https://business-communications.cloud.google.com) and open your partner account.
- Click Service account from the left menu and create a new key, download the key and open it with a text editor such as Notepad, copy private_key, client_email, and paste the values in ContactCenter > Settings > Business Messages > Synchronization.
- You are done! To test your agent visit https://business-communications.cloud.google.com/console, click your brand to enter your brand Overview area, under Agent information > Agent test URLs click on the button suitable for your mobile device and open the link from your mobile device.
More information
- The values of chips, buttons and select rich messages must have a maximum of 25 characters, and the maximum 13 values are allowed.
- Avatar image must be a JPG image of 1024x1024px with a maximum size of 50KB.
TELEGRAM
The settings below are related to the Telegram app.
Installation
- Go to the admin area of ContactCenter , then go to Settings > Telegram.
- Go here: https://t.me/botfather.
- If you have already created a Telegram bot in the past, type the command /mybots and open your bot, then click API token.
- If you never created a Telegram bot before, type the command /newbot to create a new bot. The BotFather will ask you for a name and username, enter them and generate the authentication token. More details at https://core.telegram.org/bots.
- Copy the token and paste it into Settings > Telegram > Token, then click Synchronize now.
- You're done. All messages sent to your Telegram bot will appear in the conversation admin area of ContactCenter.
More information
- ContactCenter rich messages are automatically converted to Telegram rich messages when possible, otherwise they are removed from the message.
- Telegram conversations and messages are compatible with routing and queue.
- Dialogflow is supported, including the following features: Human takeover, ContactCenter rich messages, language detection and chatbot language switcher.
- Follow-up message is supported, but the delay setting is ignored, the message is sent instantly.
- Offline message is supported, but the timetable is not sent.
VIBER
The settings below are related to the Viber app.
Installation
- Go to the admin area of ContactCenter , then go to Settings > Viber.
- Create the bot at https://partners.viber.com/account/create-bot-account.
- Copy the token and paste it into Settings > Viber > Token, then click Synchronize now.
- You're done. All messages sent to your Viber bot will appear in the conversation admin area of ContactCenter.
More information
- ContactCenter rich messages are automatically converted to Viber rich messages when possible, otherwise they are removed from the message.
- Viber conversations and messages are compatible with routing and queue.
- Dialogflow is supported, including the following features: Human takeover, ContactCenter rich messages, language detection and chatbot language switcher.
- Follow-up message is supported, but the delay setting is ignored, the message is sent instantly.
- Offline message is supported, but the timetable is not sent.
SLACK
The settings below are related to the Slack App.
Synchronization
To sync Slack click the button Start synchronization of the Settings > Slack area and follow the instructions.
Having Problems?
The synchronization of Slack may not be successful for a number of reasons; below are the most common ones:
| Problem description | Solution |
|---|---|
| Slack sync not working | Double check whether or not you chose a public Slack channel when you attempted to synchronize Slack. If you did not, try syncing Slack once again, this time choosing a public channel instead. The general channel is a good option. |
Manually archive channels
To archive a channel in Slack, follow these steps:

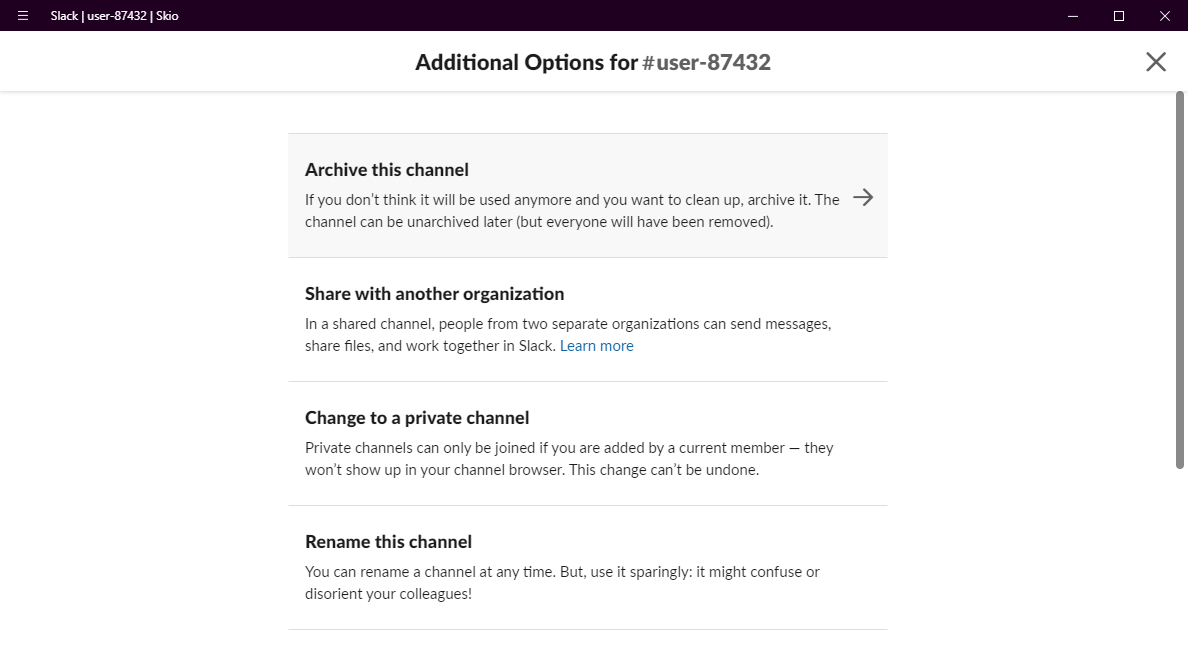
Departments linking
- Get the department IDs from Settings > Miscellaneous > departments.
- Get the channel IDs by clicking the button Get channel IDs.
User fields
The setting Settings > Slack > User fields allows you to choose which user details to include in the message sent to the main channel when a new user sends the first message. You can include the slug of your custom user details or the following slugs: browser, browser_language, location, email, user_type, token, creation_time, country_code, current_url, os, city, address, postal_code, phone, birthdate, company, timezone, website. Default: email, browser, browser_language, location.
Information
- When a new user sends the first message, a Slack message with the user details and a button to join the user's channel is sent to the main channel selected during the synchronization, or to the channel linked to the conversation's department. Only the Slack account used during the synchronization will automatically join the user's channel, other Slack members will have to join it manually via the button.
- When Settings > Slack > Agent linking is set, if the conversation is assigned to a department, only agents assigned to that department will receive the message, if the conversation is assigned to a single agent only that agent will receive the message.
- Slack is free to use. Only large companies may need a paid subscription plan, more details here.
- Push notifcations are compatible with Slack, when agents send messages via Slack, Push notifications are sent to users.
- If you're using Dialogflow, no messages will be received in Slack if the chatbot knows the answer. Once the human takeover is active all conversation's messages are sent to Slack.
- The Slack app is compatible with email piping and the messaging apps.
- Deleting or leaving a channel is not supported, only archiving a channel is supported.
- When a conversation is archived in ContactCenter , the linked Slack channel is also archived.
- When replying via Slack to a user, if the user is notified by email or text message, a Slack message is sent to notify you.
- Use the Slack command /archive to archive a conversation from Slack.
ZENDESK
The settings below are related to the Zendesk App.
Installation
- Get the domain from the URL of your Zendesk admin area, copy the first part of the URL: https://domain.zendesk.com/. For example, the domain of https://contactcenter.zendesk.com/agent/get-started/ticketing-system/ticketing-intro is contactcenter.
-
Get the API key from Left menu > Admin > Channels > API > Settings. Click Add API token.
- The email is your Zendesk account email.

More information
- Tickets converted by ContactCenter are automatically synchronized when new messages are sent and received in ContactCenter , and they are linked to an existing Zendesk user if any, otherwise a new Zendesk user is created.
- ContactCenter links Zendesk users to ContactCenter users via email or phone number.
LINE
The settings below are related to the LINE app.
Installation
- Login at https://developers.line.biz/console/ or create a new account.
- Create a new Provider and then a new Messaging API channel, select Messaging API as channel type
- From the channel Basic settings area copy Channel secret and paste it into ContactCenter > Settings > Line > Synchronization > Channel secret.
- From the channel Messaging API area generate a Channel access token (long-lived), copy it and paste it into ContactCenter > Settings > Line > Synchronization > Access token.
- Enter your Webhook URL into Webhook URL and click Verify. Get the Webhook URL from ContactCenter > Settings > Line > Synchronization > Webhook URL.
- Enable Use webhook.
- Scane the QR code with your LINE mobile app to start writing to your channel.
- You're done. All messages sent to your LINE bot account will appear in the conversation admin area of ContactCenter.
More information
- You have 7 days from when the end user's message was sent from LINE to reply to the message.
- Stickers are not supported.
- ContactCenter rich messages are automatically converted to LINE rich messages when possible, otherwise they are removed from the message.
- LINE conversations and messages are compatible with routing and queue.
- Dialogflow is supported, including the following features: Human takeover, ContactCenter rich messages, language detection and chatbot language switcher.
- Follow-up message is supported, but the delay setting is ignored, the message is sent instantly.
- Offline message is supported, but the timetable is not sent.
The settings below are related to the WeChat app.
Installation
- Visit https://mp.weixin.qq.com/cgi-bin/readtemplate?t=register/step1_tmpl&lang=en_US and register a Service account.
- After the registration enter Official accounts area and from the left menu click Settings and development > WeChat verification. You must complete the verification, it takes a few weeks and costs USD 99, or CNY 300 for chinese entities.
- From the left menu click Settings and development > Basic configuration and copy Developer ID(App ID), Developer Password(App Secret). Paste the information into ContactCenter > Settings > WeChat.
- From the left menu click Settings and development > Basic configuration and complete the server configuration (服务器配置(已启用). In Server Address(URL) enter the URL you get from ContactCenter > Settings > WeChat > Synchronization > Get configuration URL. In Token insert any value you want, the same value must be entered in ContactCenter > Settings > WeChat > Token.
- You're done. All messages sent to your WeChat account will appear in the conversation admin area of ContactCenter.
More information
- If you receive an error like {"errcode":41001,"errmsg":"access_token missing rid: 631111-470b3b22-48553870"} you need to whitelist our server IP address from Official Account > Settings and Development > Basic Configuration > IP whitelist.
- WeChat files and location attachments are not supported and are not received by ContactCenter.
- Links are not supported in WeChat, they are converted to texts.
- ContactCenter rich messages are automatically converted to WeChat rich messages when possible, otherwise they are removed from the message.
- WeChat conversations and messages are compatible with routing and queue.
- Dialogflow is supported, including the following features: Human takeover, ContactCenter rich messages, language detection and chatbot language switcher.
- Follow-up message is supported, but the delay setting is ignored, the message is sent instantly.
- Offline message is supported, but the timetable is not sent.
MORE SETTINGS
This section contains help for other settings not listed above.
Keyboard shortcuts
Admin area keyboard shortcuts are enabled on both PC and MAC and work as follows:
| Shortcut | Description |
|---|---|
ENTERor SPACE |
Confirm or close a dialog alert; the same as clicking OK. |
ESCor CANCEL |
Decline a dialog alert and close it. |
SHIFT + ENTER or CTRL + ENTER |
Add a line break to a message. This only works for the admin editor. |
ESC |
Close a lightbox. |
CANCEL |
In the admin conversations area, archive a conversation, or delete it. |
CTRL + UP/DOWN ARROW |
In the admin conversations area, navigate between the conversations of the list. |
CTRL + RIGHT/LEFT ARROW |
In the admin users area, navigate between the users. |
CTRL + V |
Paste an image from the clipboard and send it as message. |
Supervisor
- Supervisors must be administrators.
- Add multiple supervisors by adding comma separated admin IDs.
URL parameters
Front-end chat
URL parameters allow the chat to perform specific actions on page load. To use them, append the URL parameters below to any URL on your website that displays the chat. Ex. https://example.com/?conversation=1234
| URL parameter | Description |
|---|---|
?token=TOKEN |
Login an existing user. Replace TOKEN with the user's token. |
?conversation=ID |
Open a conversation. Replace ID with the conversation ID. The attribute token is required for not logged in users. |
?chat=open |
Open the chat. |
Zapier
Integrate Zapier with ContactCenter by following the steps below. Integration is based on the ContactCenter webhooks, each webhook is a Zapier trigger, so you have 15+ Zapier triggers available, for more details visit the webhooks page.
- Go to https://developer.zapier.com/ and login, or register a new account.
- Create a new integration by clicking Start a Zapier Integration, or visit https://developer.zapier.com/app/new. Fill in all required fields, like name and description, and click Create, you can enter any text you want, but keep the name of the app in mind because you will need it later.
- From the left menu click Triggers and then Add Trigger.
- Fill in all required fields, like key and description, and click Save And Continue, you can enter any text you want.
- On top click API Configuration, choose REST Hook as Trigger Type, and click Save.
- Go back to the Settings area of the trigger, or go to https://zapier.com/app/zaps, and click Create a Zap.
- Search for your newly created app by entering the app name and click it. In Trigger Event select your trigger and click continue.
- Copy the Webhook URL, click Continue, and then enter the ContactCenter admin area and enter it into Settings > Miscellaneous > Webhooks > URL, activate the webhooks, save the settings and reload ContactCenter .
- Make something to trigger a webhook like sending a message, or creating a new user, then go back to Zapier and click Test Trigger and you should see the ContactCenter webhook data. Click Continue.
- Click the right button Filters and set up the filter in order to trigger the integration only if a variable exists. You need the filter because ContactCenter will send all webhooks to all zaps. Example: if your zap wants to integrate the messages of ContactCenter , you will need to set the filter to continue only if the variable message exists.
- Click Continue, or + and add your integration.
- To use multiple zaps and webhooks you will need to update Settings > Miscellaneous > Webhooks > URL and add the new zap IDs, separated by commas. Example: if you have two zaps with URLs https://hooks.zapier.com/hooks/catch/10352851/bbad21f/ and https://hooks.zapier.com/hooks/catch/10352851/aaaa66t/, the URL must be https://hooks.zapier.com/hooks/catch/10352851/bbad21f,aaaa66t/.
More Information
- Welcome messages are not sent to slack and conversations containing only the welcome message (and no response) are automatically archived.
- Follow-up messages are sent a maximum of once every 24 hours.
- A popup message is always shown default, until the user manually closes it; then it stays closed.
- The Users and Conversations sections in the ContactCenter admin area use auto-pagination on scroll, which is limited to 100 results per scroll.
- The privacy message is not shown if the Require registration option has been enabled.